


It was 2018 and I was given a chance to rewrite an iOS app that facilitates an annual iOS conference based in Singapore: iOS Conf SG. Being an iOS dev, I have no prior knowledge of building a full backend application, but I understand what services needed to make the client app.
We already had the current app running with Firebase, but I had difficulties with NoSQL. I am also more familiar with relational database such as MySQL and PostgreSQL. GraphQL was gaining momentum and I was particularly attracted by GraphQL Subscriptions. That's when I stalked Hasura development and after attending one of Hasura workshop, I got the confidence to use it to improve the app!
GraphQL Subscriptions enable clients to immediately notified whenever there's a change. Having the ability to update the schedule in real time is immensely convenient and became the most desired feature. I want to be able to update any content and the app in attendees' hand will immediately gets updated 💫!
This is how it looks like when the whole Hasura GraphQL + iOS App stacks are integrated. This article, however, is about the API and not the iOS app. I will guide you step-by-step on how I built the GraphQL API from scratch, including some of my thought processes.
A journey of a thousand miles begins with a single step
Let's follow along, one step at a time 🐾
Setup
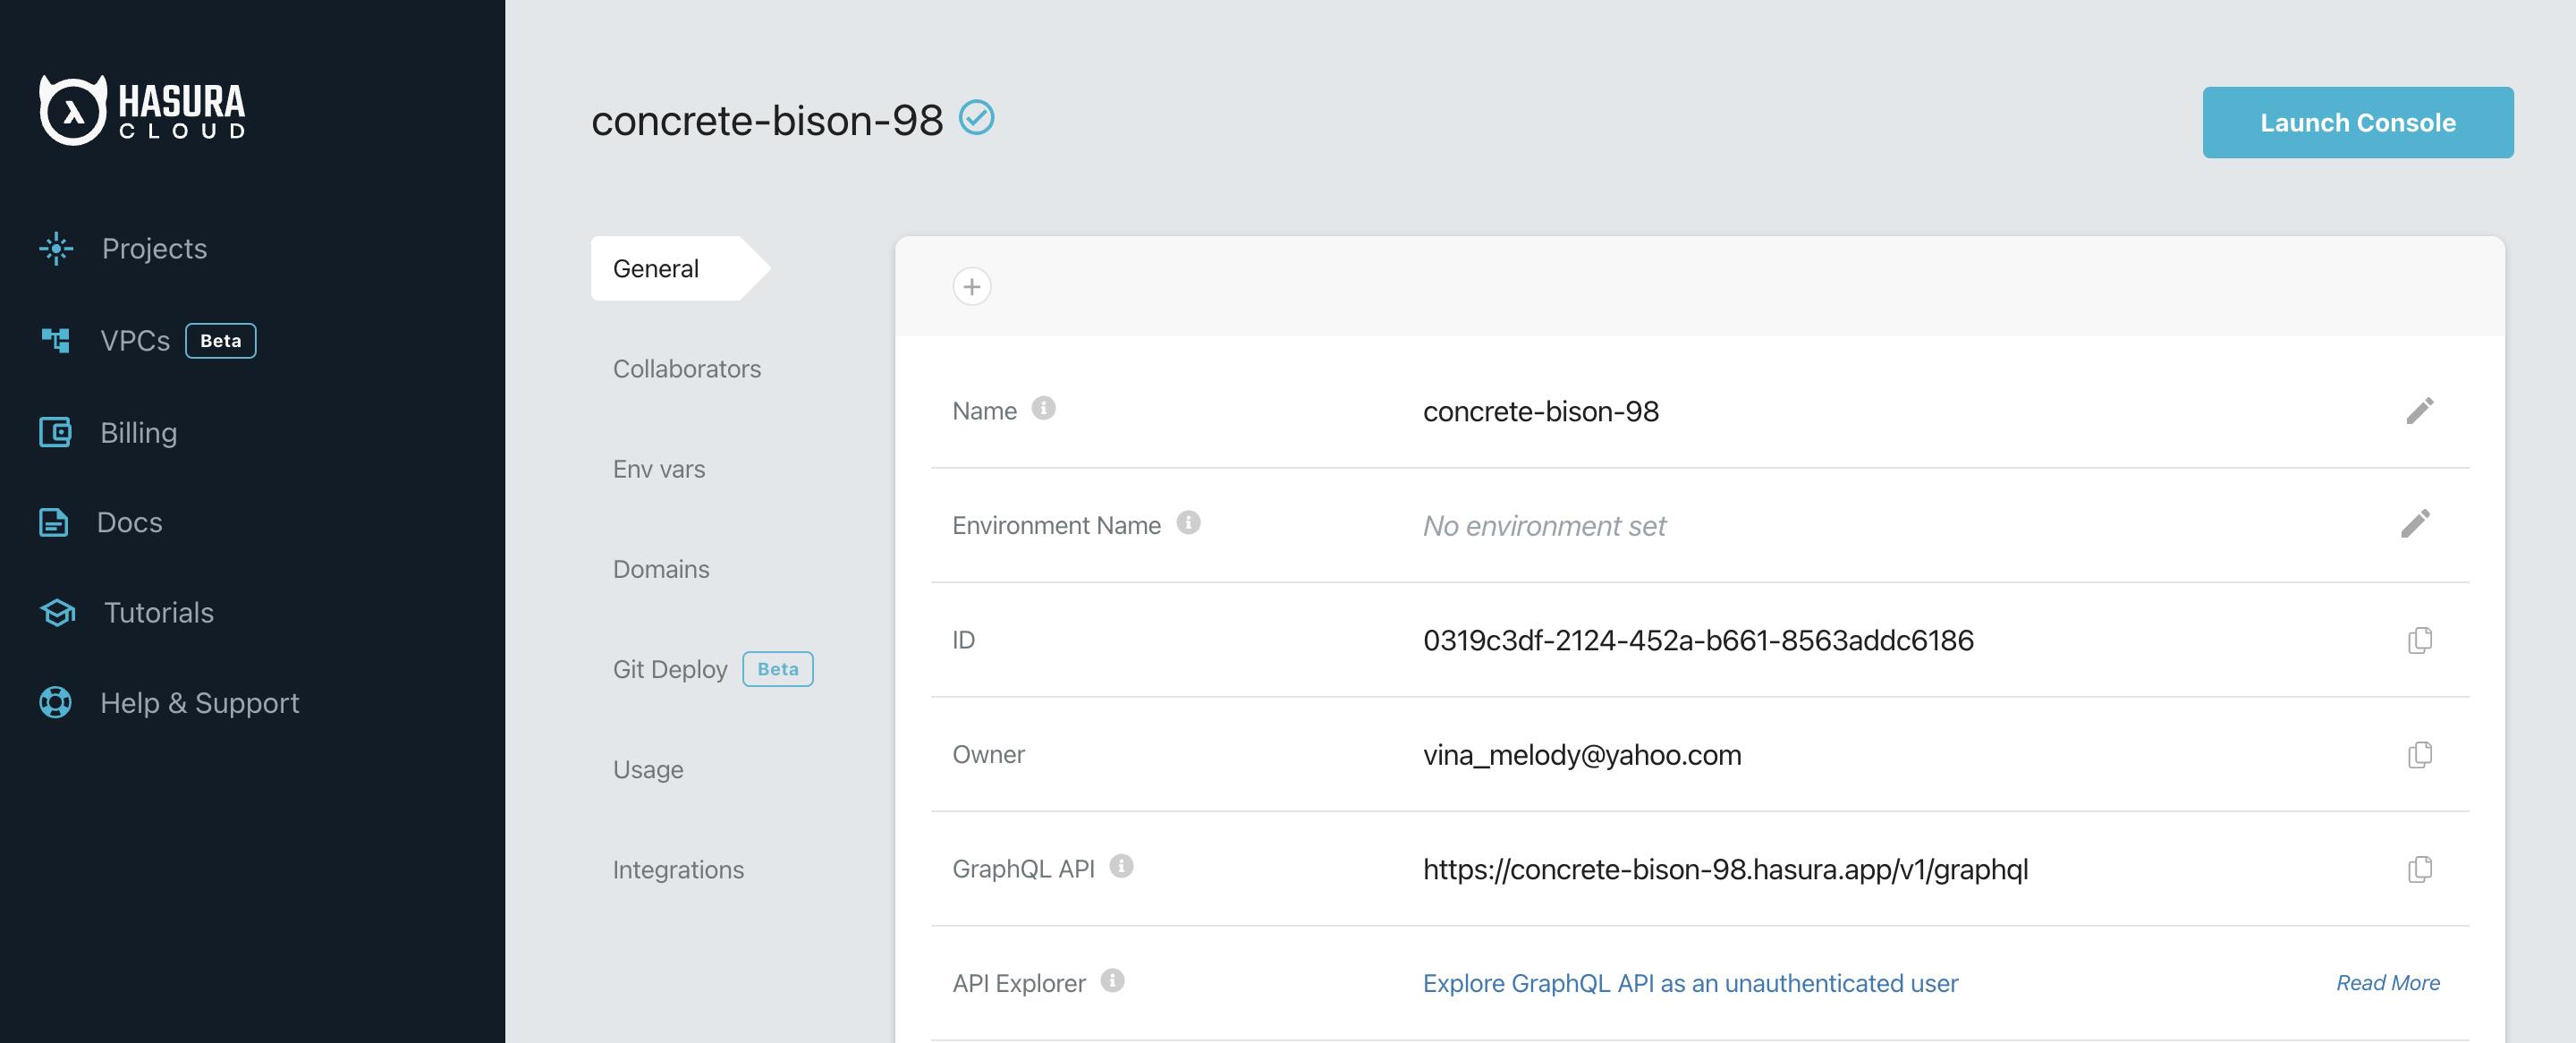
Create a Hasura account, and create a new project. A free tier should be good for now. Click Launch Console button on the top right.
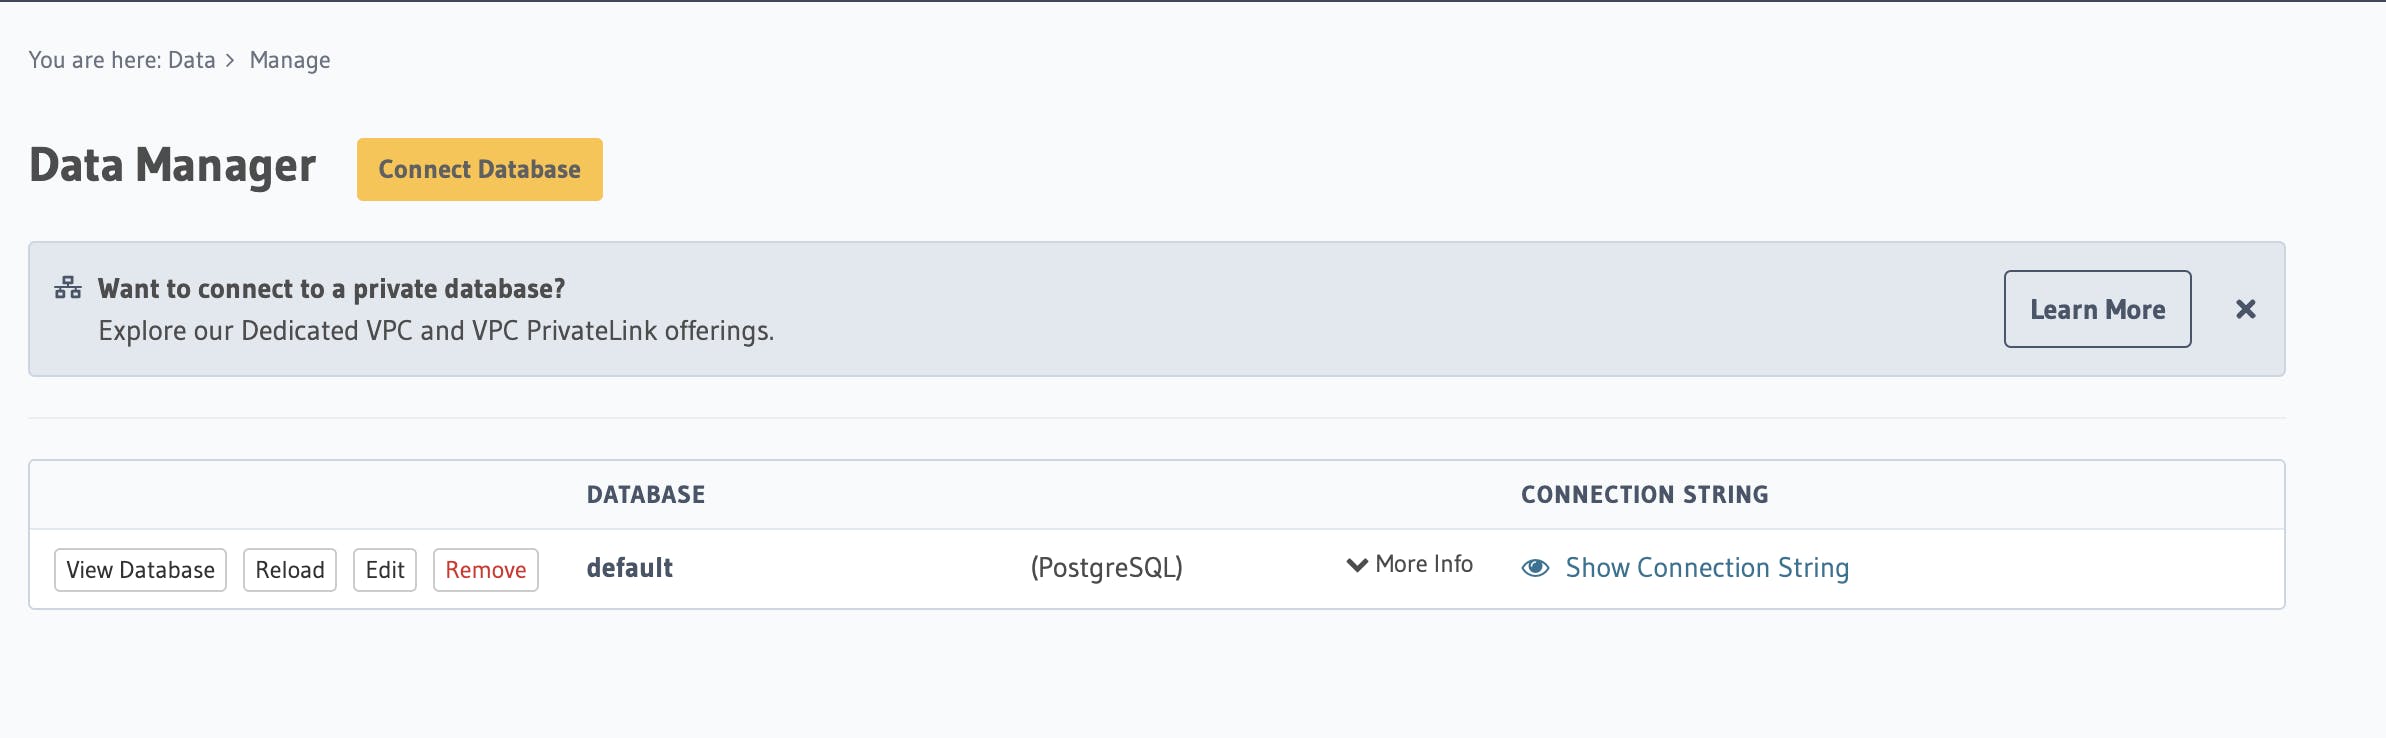
We don't have a database yet, so let's create it. Click Create Heroku Database tab and Create Database.

Now the default PostgreSQL database is created, we can start creating our data tables.
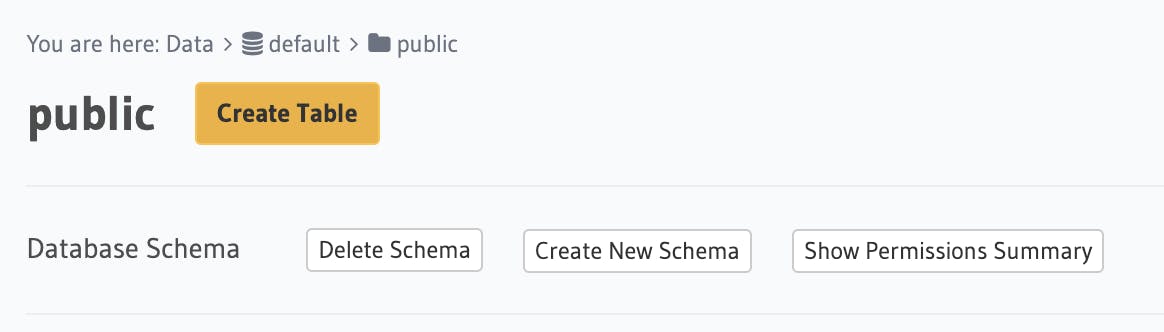
Tables
The way we design tables and relationships will impact the end result, which is the JSON API response.
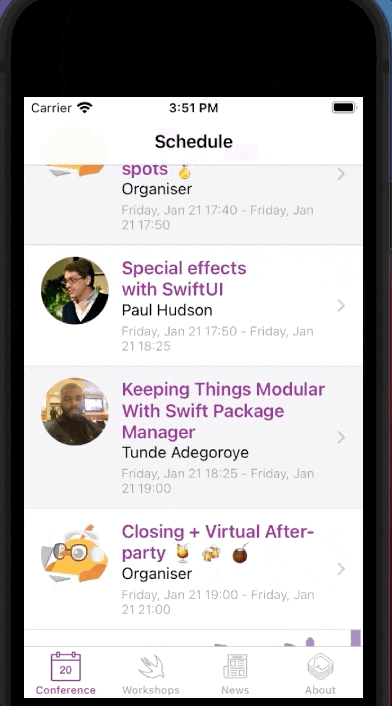
Imagine these screens on the client side. The user should see the schedule containing list of talks. And when a talk is tapped, we'll show the talk detail.
The JSON response that works for me looks like this: schedule is a list of talks and each talk has speakers key which value can be a array of speakers.
{
  "data": {
    "schedule": [
      {
        "activity": "iosconfsg22.day2",
        "start_at": "2022-01-21T09:50:00+00:00",
        "end_at": "2022-01-21T10:25:00+00:00",
        "id": 43,
        "speaker_bio": "Paul is the author of Hacking with Swift, Pro Swift, Swift Design Patterns, Server-Side Swift, Hacking with macOS, Hacking with watchOS, Hacking with tvOS, Swift Coding Challenges, and more. Suffice it to say, he quite likes Swift. And coffee. (But mostly Swift.) (And coffee.)",
        "speaker_company": "Hacking with Swift",
        "speaker_image": "paul",
        "speaker_name": "Paul Hudson",
        "speaker_twitter": "twostraws",
        "talk_description": "SwiftUI is the fastest way to build apps using all the system-standard components we know and love, but in this talk we're going to stop for a moment and try to build something fun, beautiful, and unlike anything you've seen before.",
        "talk_type": "normalTalk",
        "title": "Special effects with SwiftUI"
      },
      ...
    ]
  }
}
I recommend that you should create tables that are not dependent to any other table yet. In this case, Speakers and Talks table are independent. Let's begin!
Speakers table
Click Create table and add columns such as name, company, short_bio, twitter.
Pay attention to the button + Frequently used columns as it's very helpful to speed up creation time. You can use it for id, created_at and updated_at. Ensure that id is selected as the primary key and create the table.

Now you can see a speakers table on the database schema tree on the left. Feel free to inspect the other tabs.
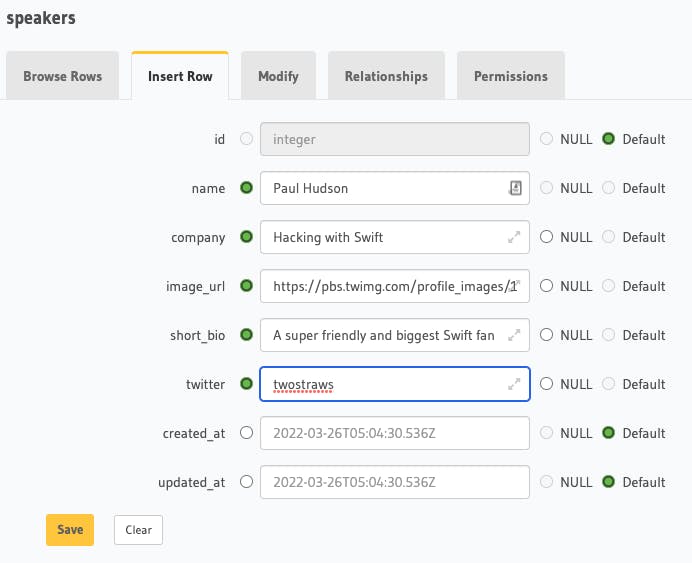
Now let's add some speakers data using Insert Row tab.
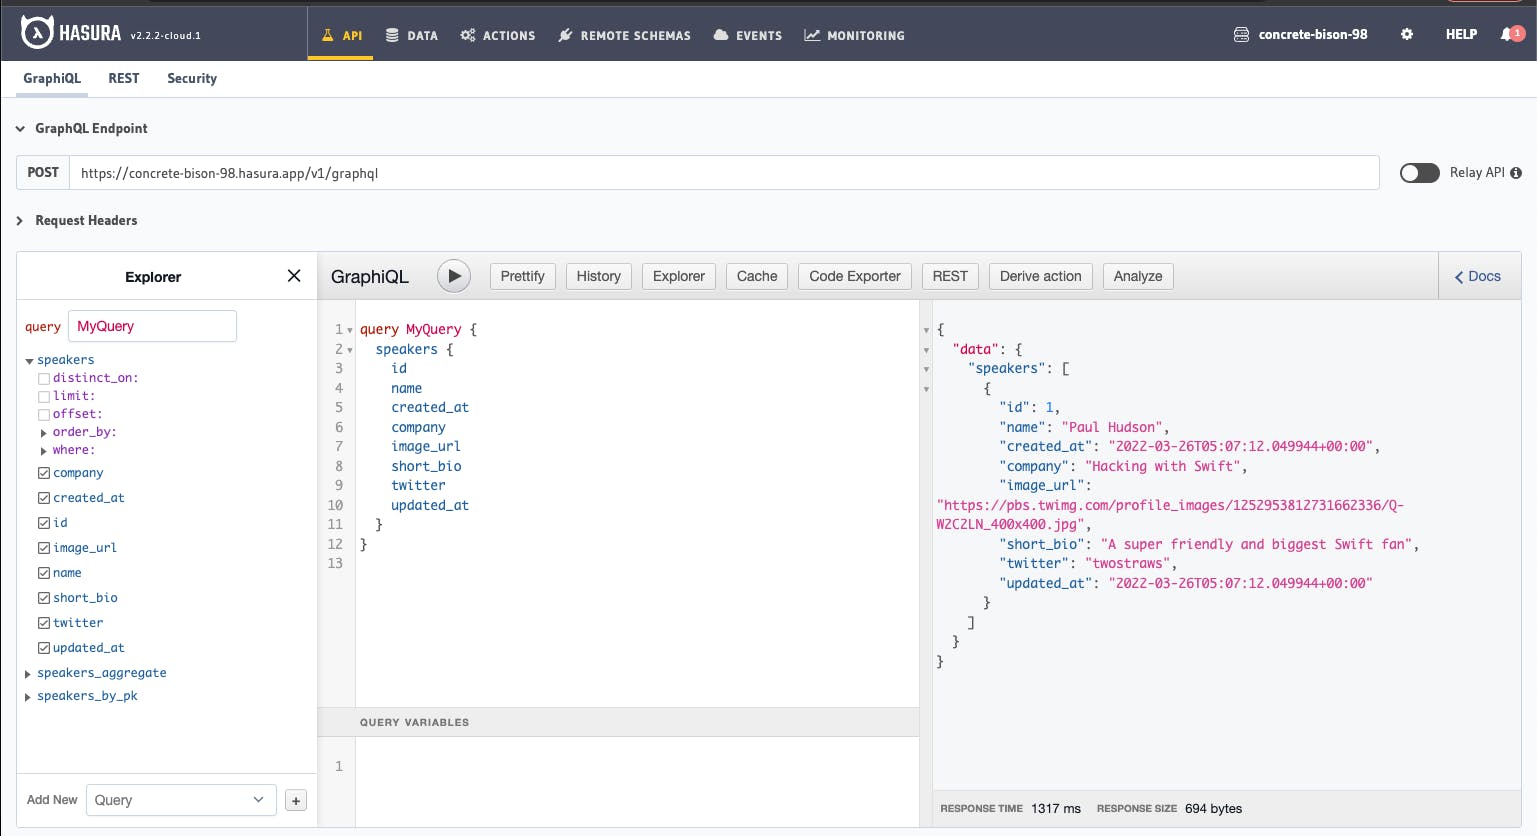
Once saved, go to Hasura's API page and you will see the Graphiql, click speakers and tick all the info. You should now see that there's one record from speakers!
Talks table
We have a speaker, now it's time to have a table to store talks.
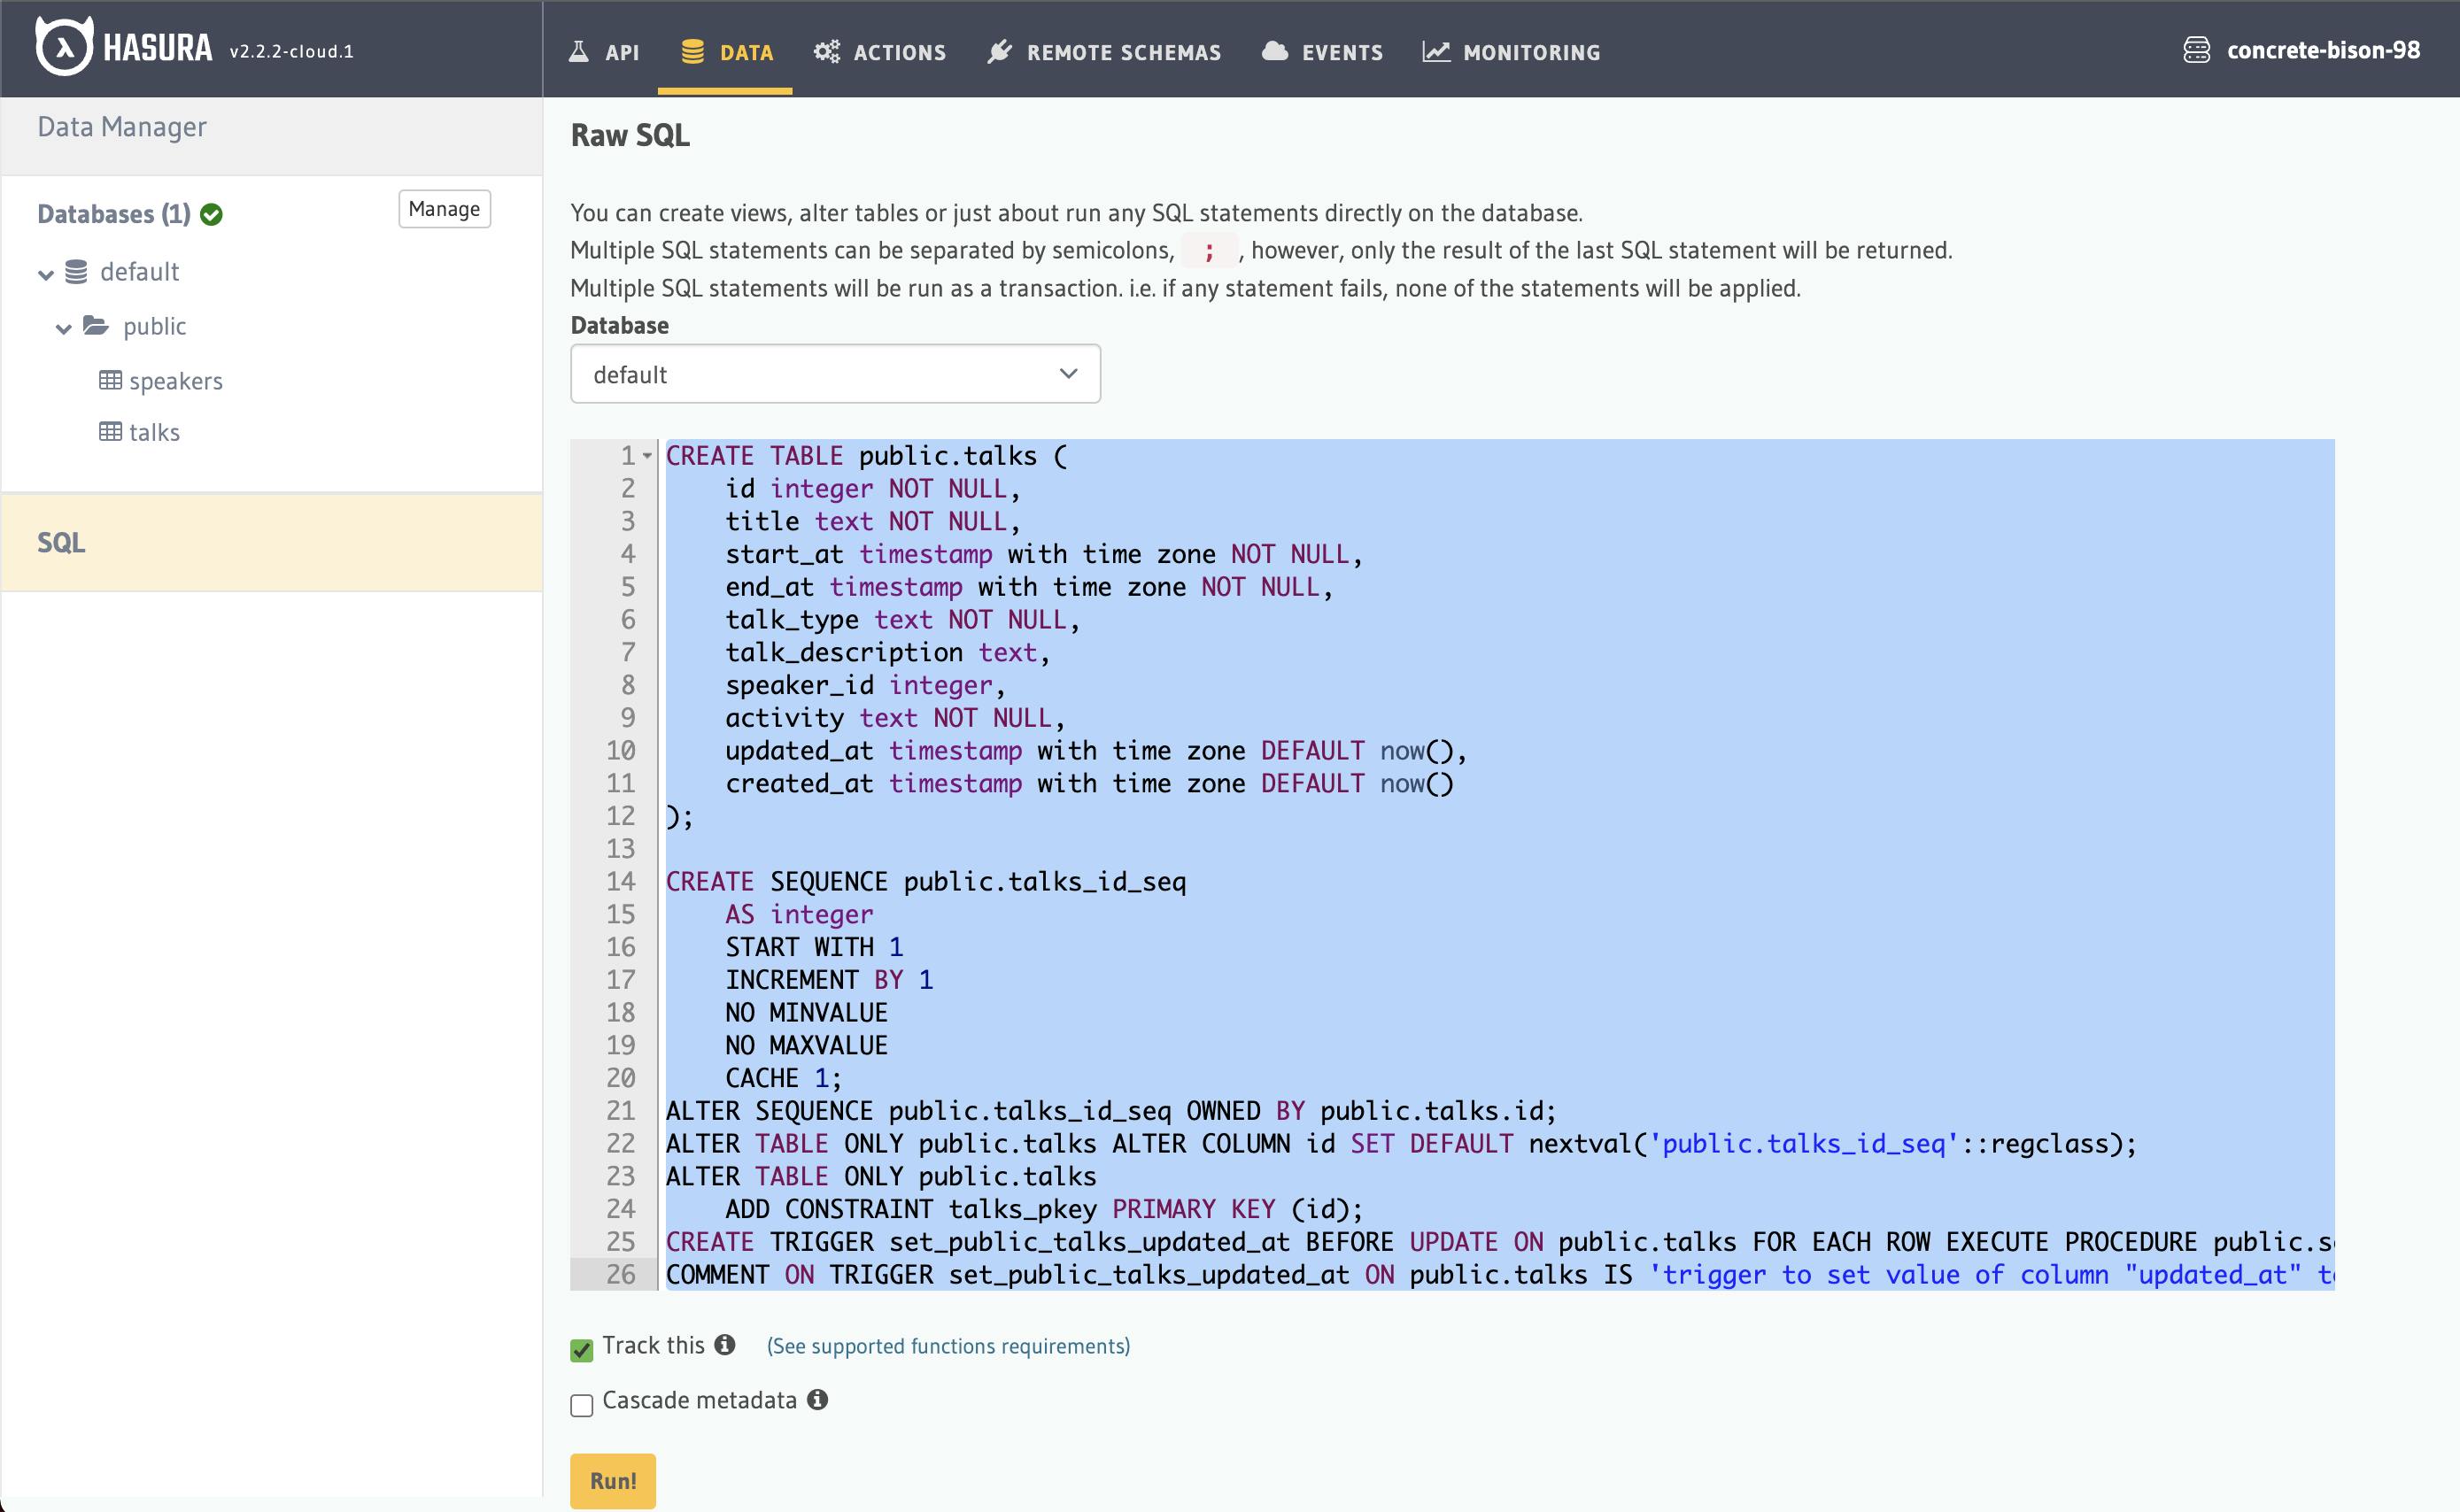
Let me show you a more advanced way of creating a table through SQL statement. Click Hasura Data menu on top and then SQL, and paste the following:
CREATE TABLE public.talks (
    id integer NOT NULL,
    title text NOT NULL,
    start_at timestamp with time zone NOT NULL,
    end_at timestamp with time zone NOT NULL,
    talk_type text NOT NULL,
    talk_description text,
    activity text NOT NULL,
    updated_at timestamp with time zone DEFAULT now(),
    created_at timestamp with time zone DEFAULT now()
);

CREATE SEQUENCE public.talks_id_seq
    AS integer
    START WITH 1
    INCREMENT BY 1
    NO MINVALUE
    NO MAXVALUE
    CACHE 1;
ALTER SEQUENCE public.talks_id_seq OWNED BY public.talks.id;
ALTER TABLE ONLY public.talks ALTER COLUMN id SET DEFAULT nextval('public.talks_id_seq'::regclass);
ALTER TABLE ONLY public.talks
    ADD CONSTRAINT talks_pkey PRIMARY KEY (id);
CREATE TRIGGER set_public_talks_updated_at BEFORE UPDATE ON public.talks FOR EACH ROW EXECUTE PROCEDURE public.set_current_timestamp_updated_at();
COMMENT ON TRIGGER set_public_talks_updated_at ON public.talks IS 'trigger to set value of column "updated_at" to current timestamp on row update';
Ensure the Track this checkbox is ticked! Click Run! button and wait until you see the message SQL executed on the top right toast notification. Now you should see a new talks table on the left! isn't it faster 😆 by SQL statement?
You might ask, how do I get the SQL statement correctly? I'm glad you asked, it will take another long post but the short story is that I got it from pgdump, which is the process to backup a PostgreSQL database. You can find more info on PG dump API here.
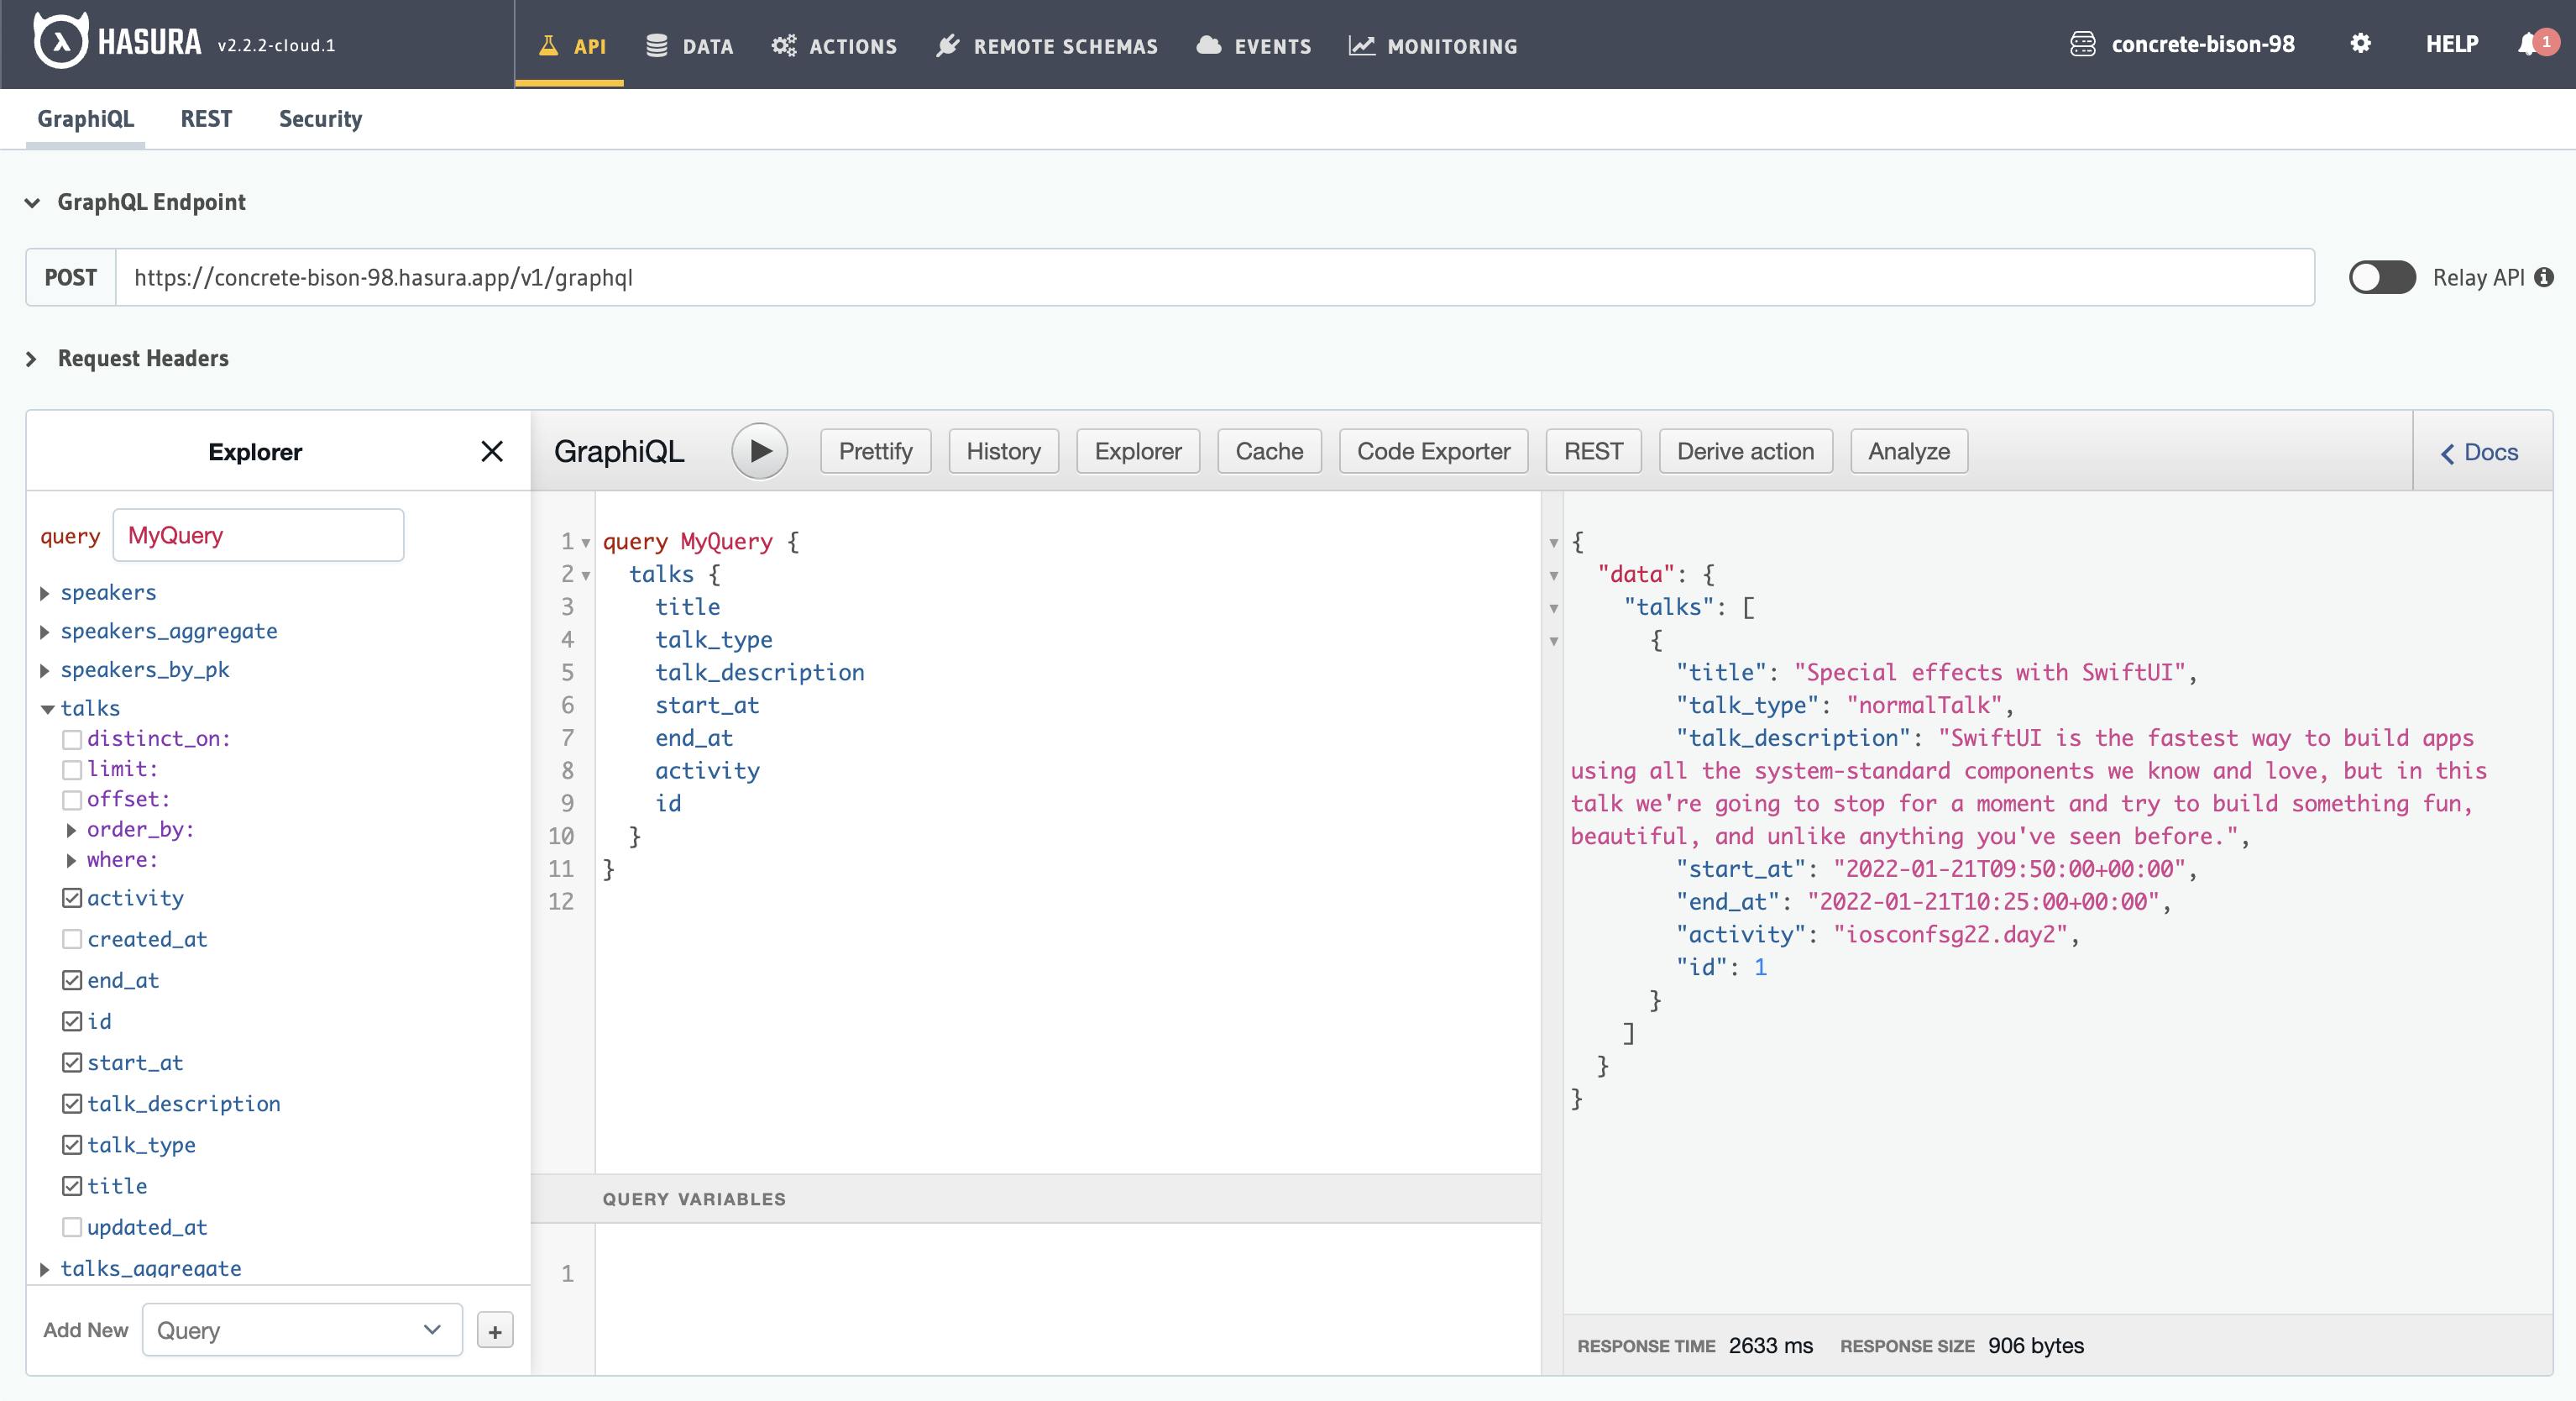
Let me also show you the way to insert a talk using GraphQL mutation, which I think, it is safer and faster once you get the gist of it.
Let's go to the Graphiql and paste this and click the Play button to run it.
mutation insertTalks {
  insert_talks(objects: [
    {
         activity: "iosconfsg22.day2",
      start_at: "2022-01-21T09:50:00+00:00",
      end_at: "2022-01-21T10:25:00+00:00",
      talk_description: "SwiftUI is the fastest way to build apps using all the system-standard components we know and love, but in this talk we're going to stop for a moment and try to build something fun, beautiful, and unlike anything you've seen before.",
      talk_type: "normalTalk",
      title: "Special effects with SwiftUI"
    }
  ]) {
    affected_rows
  }
}
If successful, you should see there's 1 affected row!

Now if you query talks table, you should also get 1 record.
Congrats! Now you've learned 2 different ways of creating a table and 2 different ways of inserting a record. There's actually 1 more way to insert a record using SQL insert statement however, in my opinion it's more error prone because you need to either match the order of data with order of column, or specify the column sequence in the insert statement itself (some of you might not understand this for now but my point is ... trust me, go with the easier one 😉).
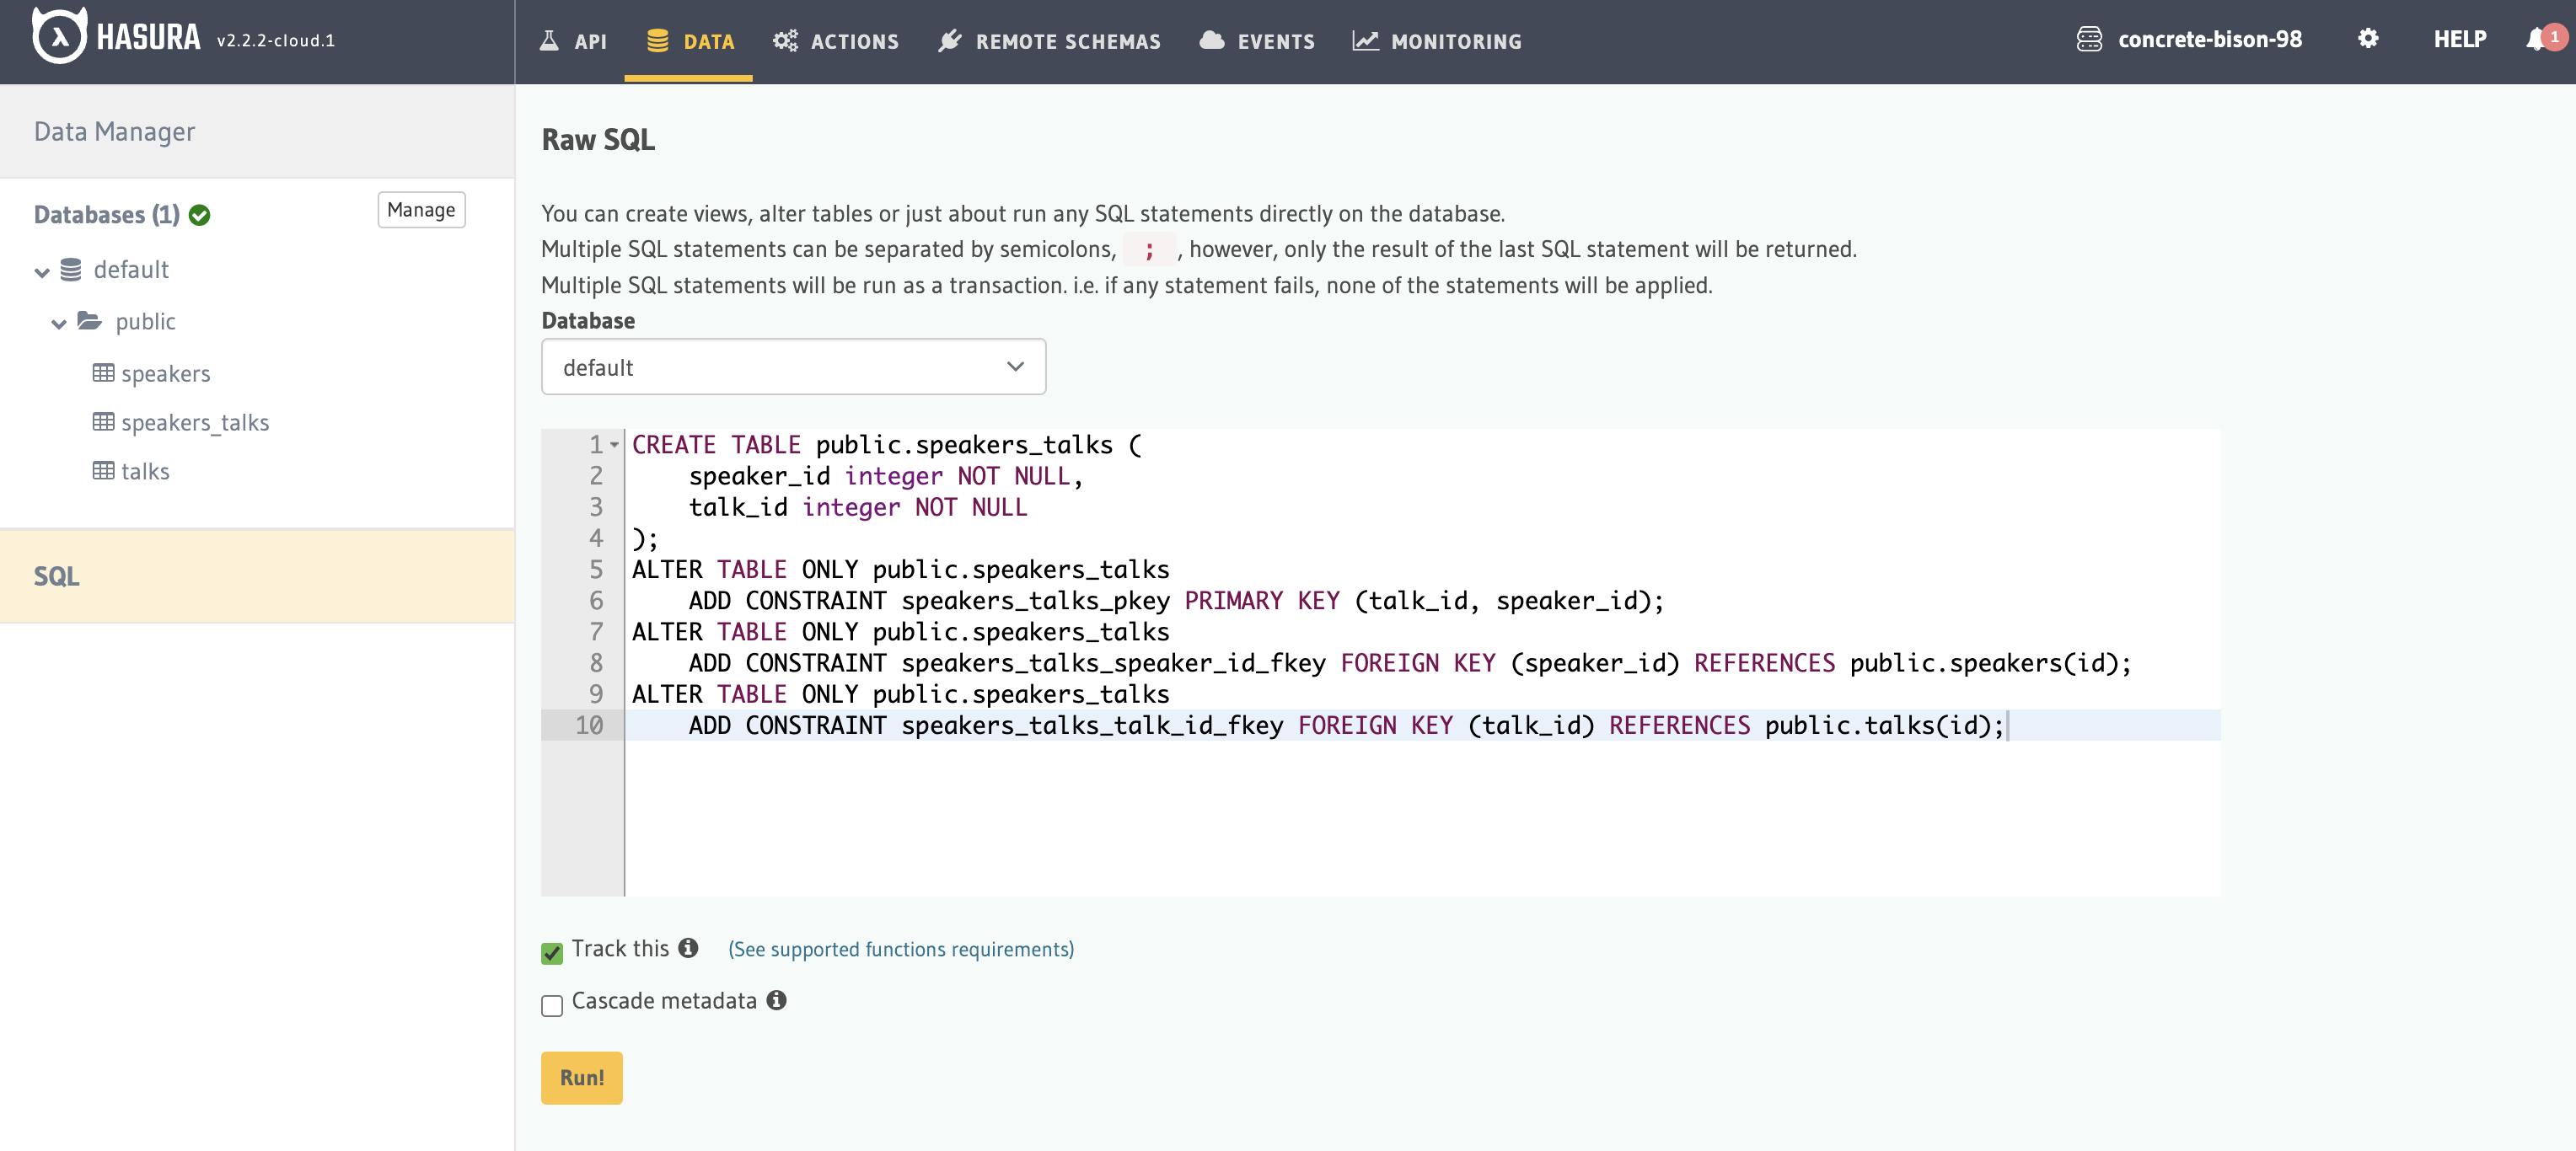
Relationship table
Alright now we've come to the part where we need to link speakers and talks table by defining the relationship.
Remember the JSON shape that we want? each talk can have 1 or more speakers. There's a need to define a bridging table where it looks like this.
| talk_id | speaker_id |
| 1 | 1 |
And if 1 talk has 2 speakers
| talk_id | speaker_id |
| 2 | 2 |
| 2 | 3 |
This is called a "normalisation" table, I believe ... so let's move on and create this using SQL statement. Go to the Raw SQL again and paste this.
CREATE TABLE public.speakers_talks (
    speaker_id integer NOT NULL,
    talk_id integer NOT NULL
);
ALTER TABLE ONLY public.speakers_talks
    ADD CONSTRAINT speakers_talks_pkey PRIMARY KEY (talk_id, speaker_id);
ALTER TABLE ONLY public.speakers_talks
    ADD CONSTRAINT speakers_talks_speaker_id_fkey FOREIGN KEY (speaker_id) REFERENCES public.speakers(id);
ALTER TABLE ONLY public.speakers_talks
    ADD CONSTRAINT speakers_talks_talk_id_fkey FOREIGN KEY (talk_id) REFERENCES public.talks(id);
What we're going to do is:
- Create a table called
speakers_talkswith only 2 columns:speaker_idandtalk_id - The primary key of this table should be the combination of
talk_idandspeaker_idthis ensure that there must be no duplicated pair added to the record - The
speaker_idof this table should have a reference fromspeakerstableidcolumn - Likewise, the
talk_idof this table should have a reference fromtalkstableidcolumn
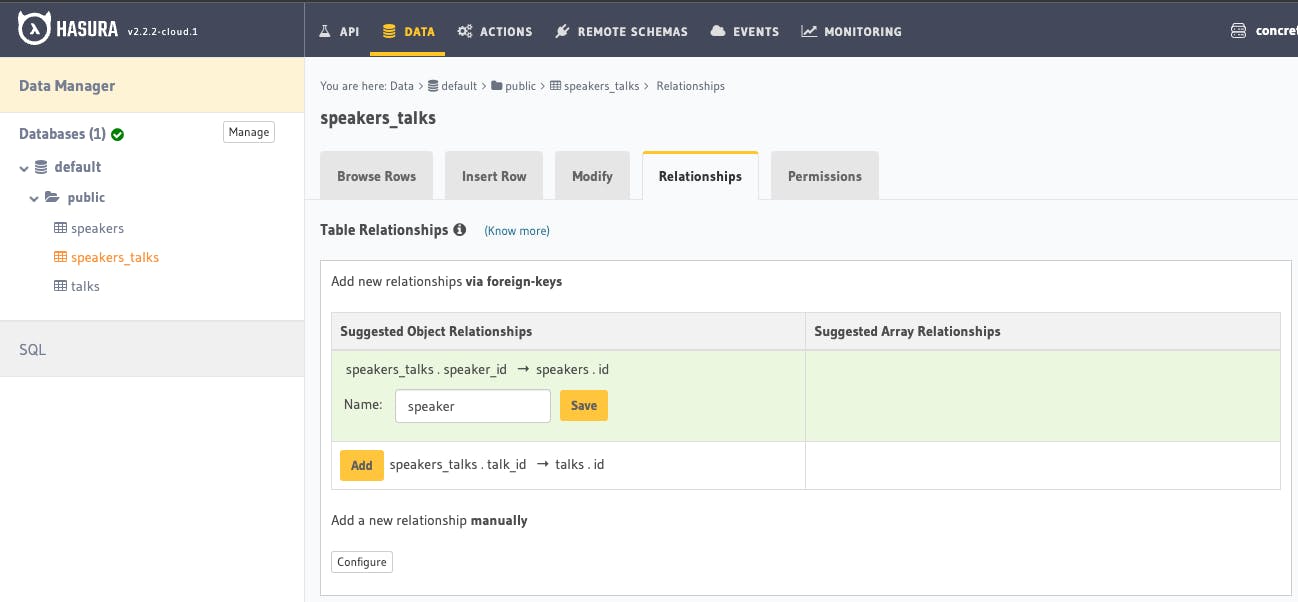
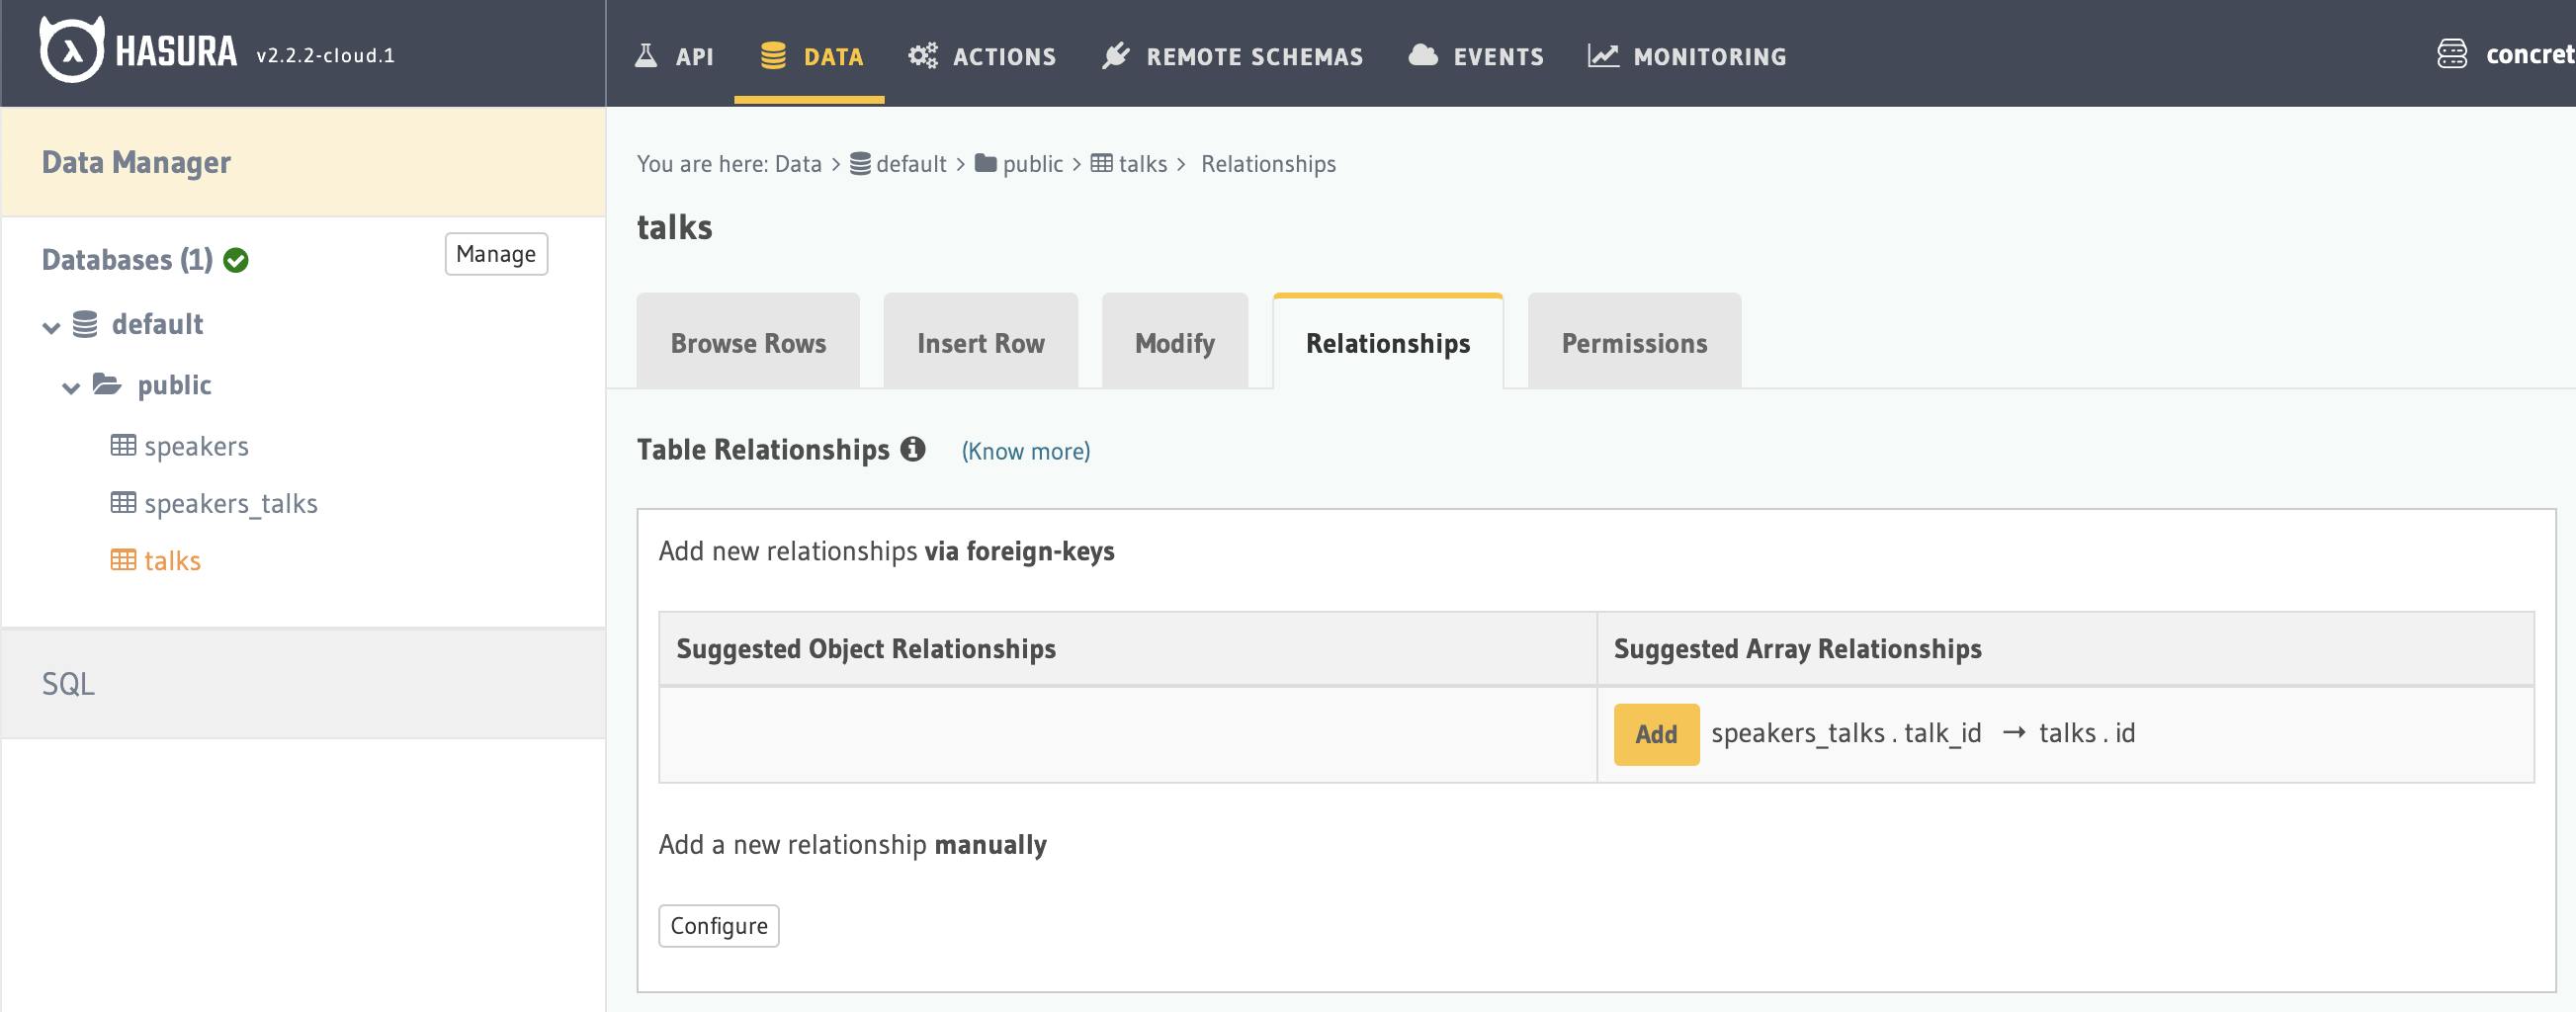
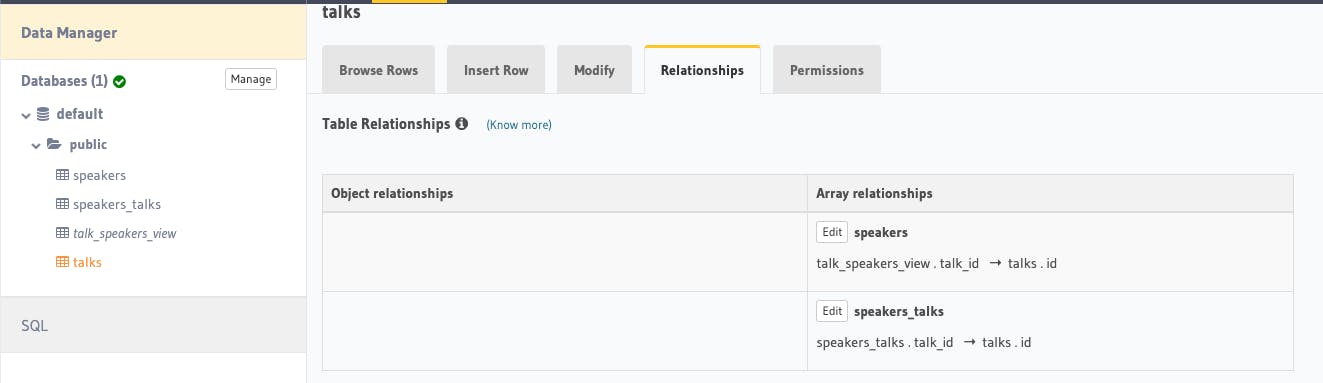
Once Run, you will see something is updated in each table's Relationship tab.
This is for the speakers_talks table. Click Add and Save for each suggested relationship.
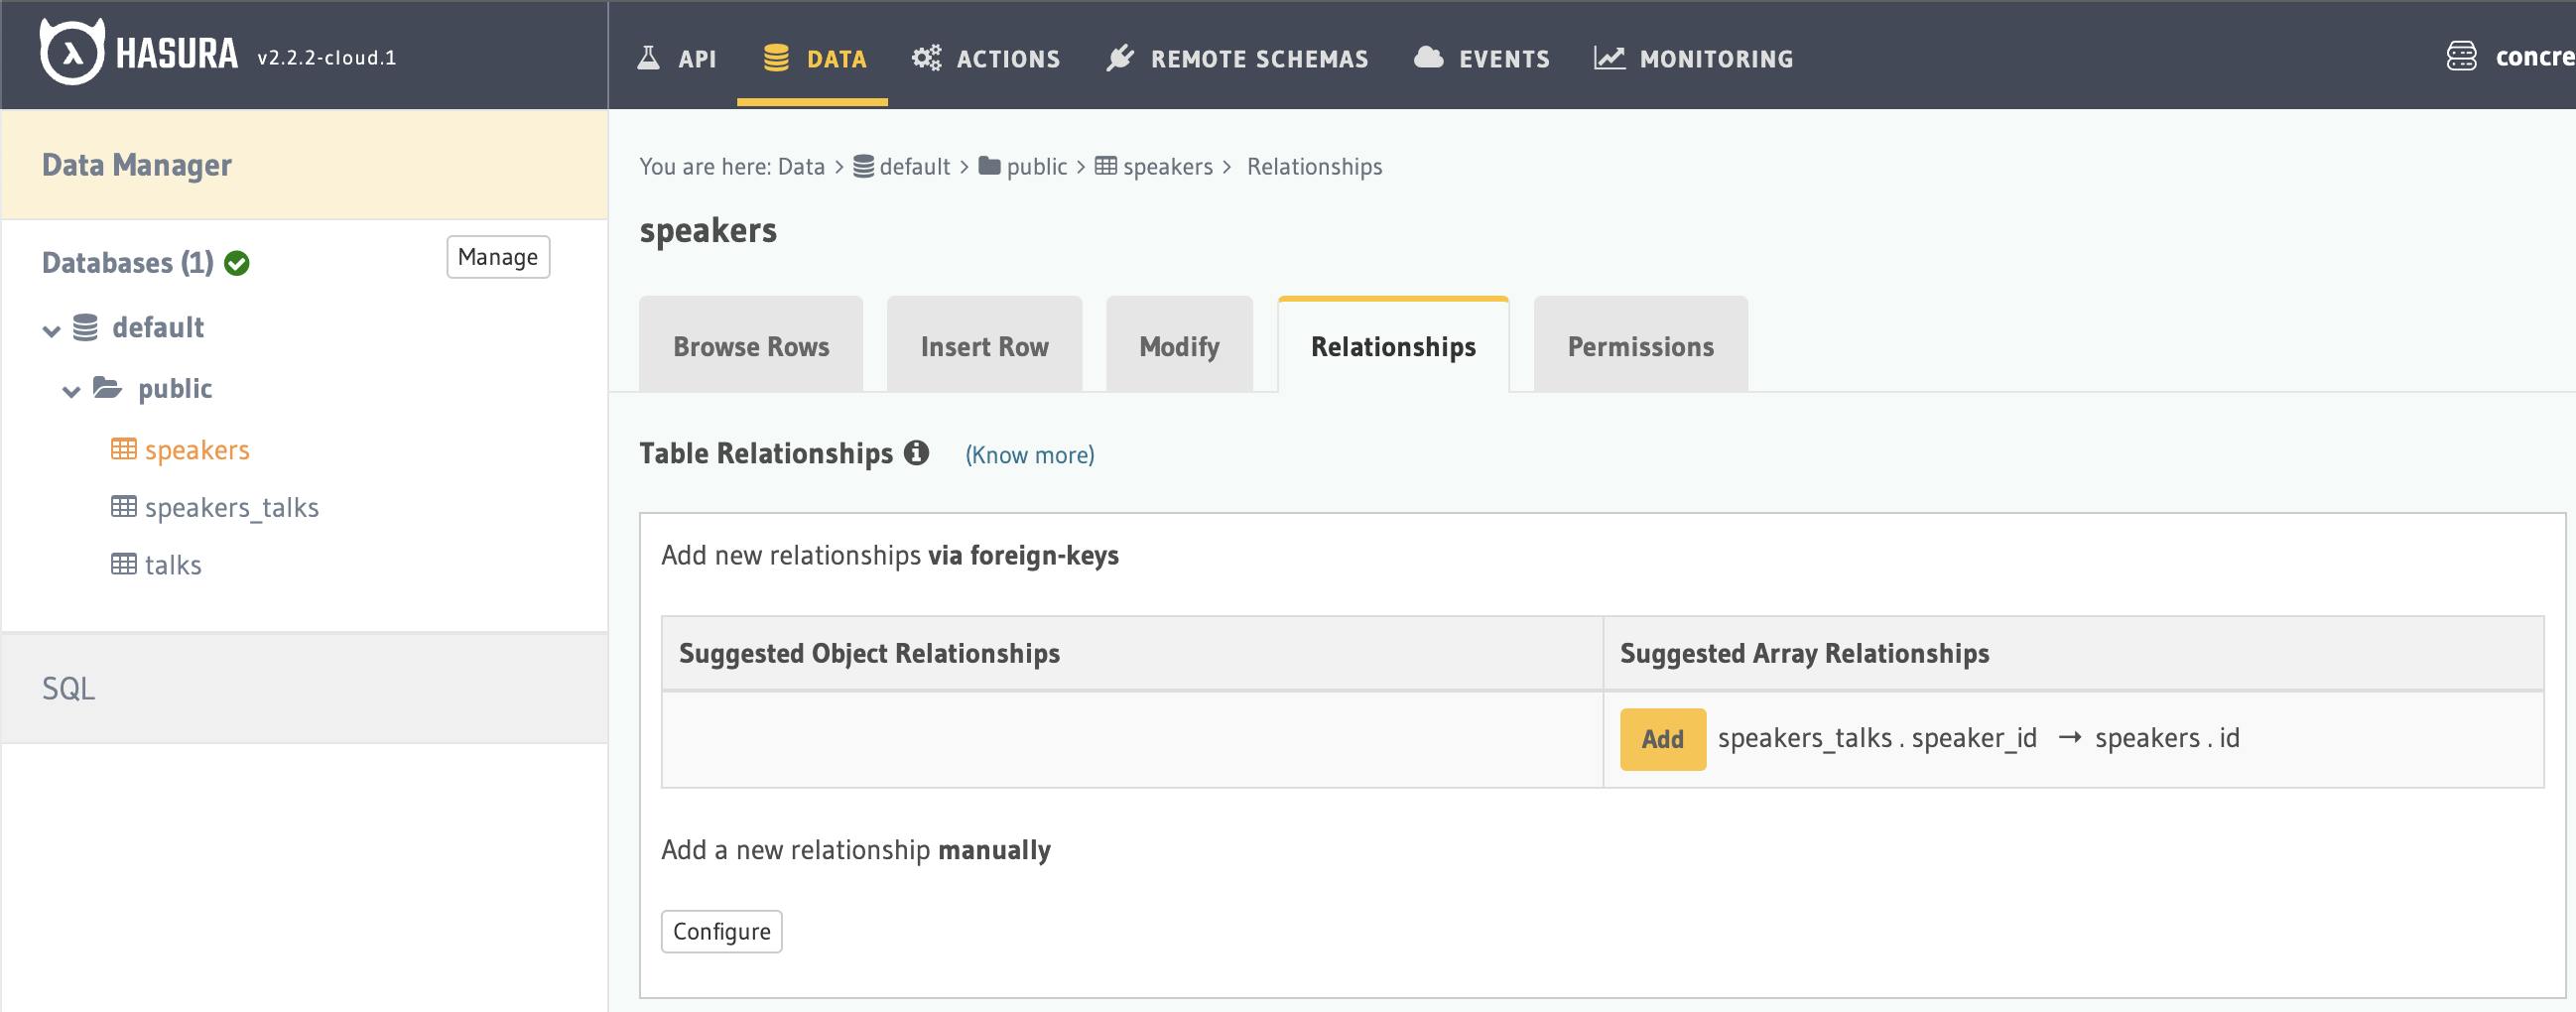
This is for speakers table, add and save.
And this is for talks table, add and save.
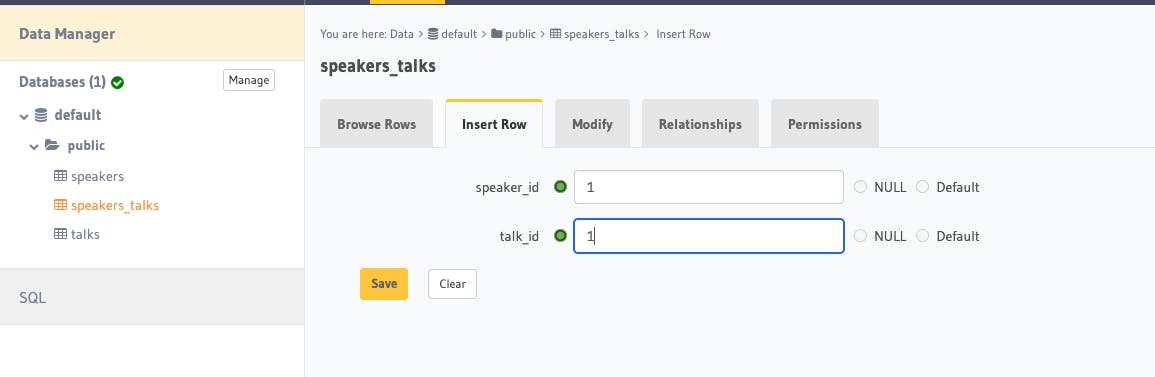
We also want to insert a row that says speaker_id 1 is linked to talk_id 1, and save it.
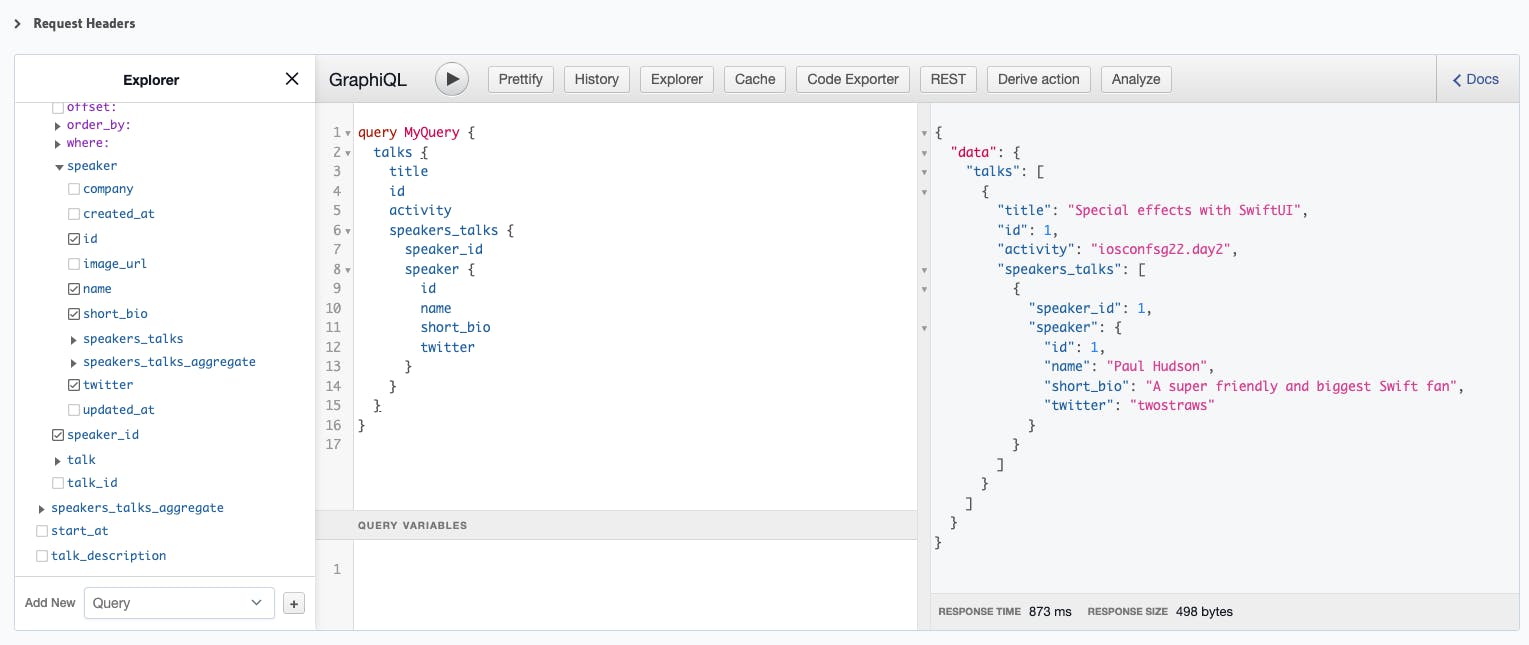
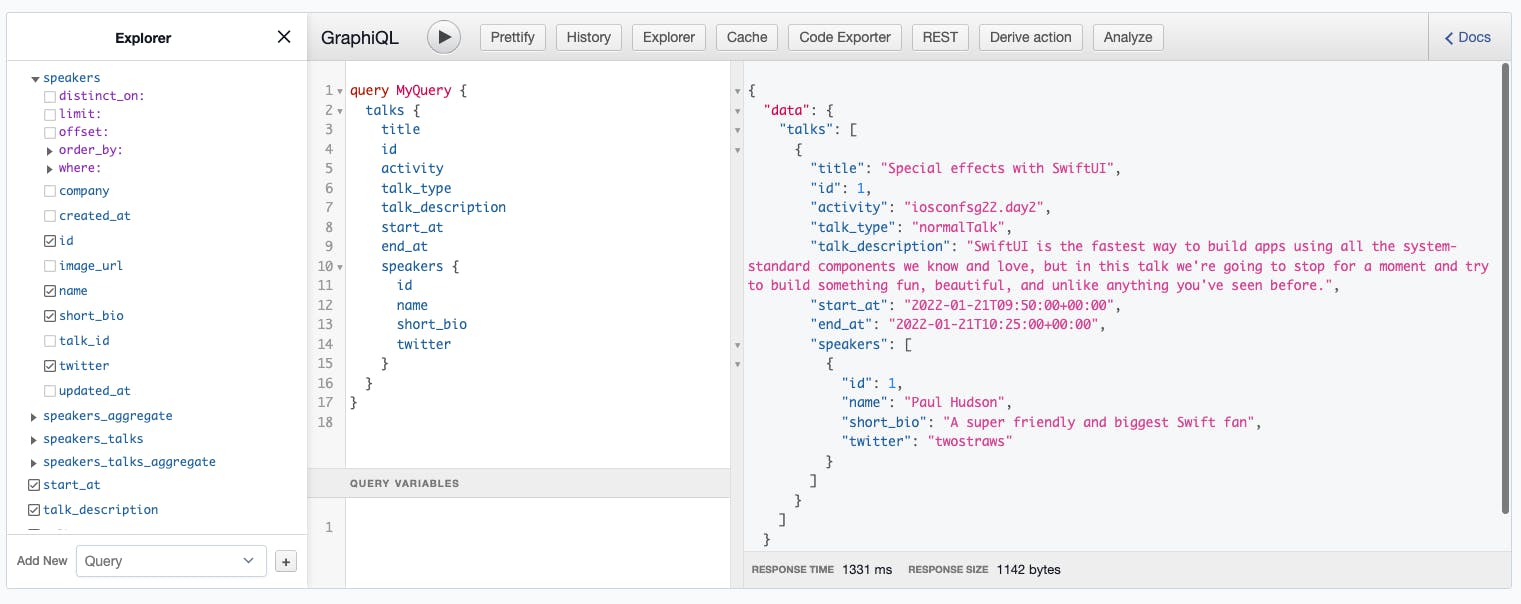
To confirm that our relationship table works, you should now be able to query this from the Graphiql!
query MyQuery {
  talks {
    title
    id
    activity
    speakers_talks {
      speaker_id
      speaker {
        id
        name
        short_bio
        twitter
      }
    }
  }
}
That looks great but you might wonder, the API response that we want is without speakers_talks and that's where we will also flatten the query through a view!
Bridging Views
A database view is a way to present data from multiple table query. We can use this method to combine the data from both standalone talks and speakers tables!
Head over to the Raw SQL and paste this snippet to create the bridging view.
CREATE OR REPLACE VIEW talk_speakers_view AS
SELECT talk_id, speakers.*
FROM speakers_talks LEFT JOIN speakers
ON speakers_talks.speaker_id = speakers.id;
Notice that this view has talk_id from talks column and the rest of columns are from the speakers table.
Now we need to create the array relationship to this view. Go to talks table, Relationship tab, and let's configure a new relationship manually.
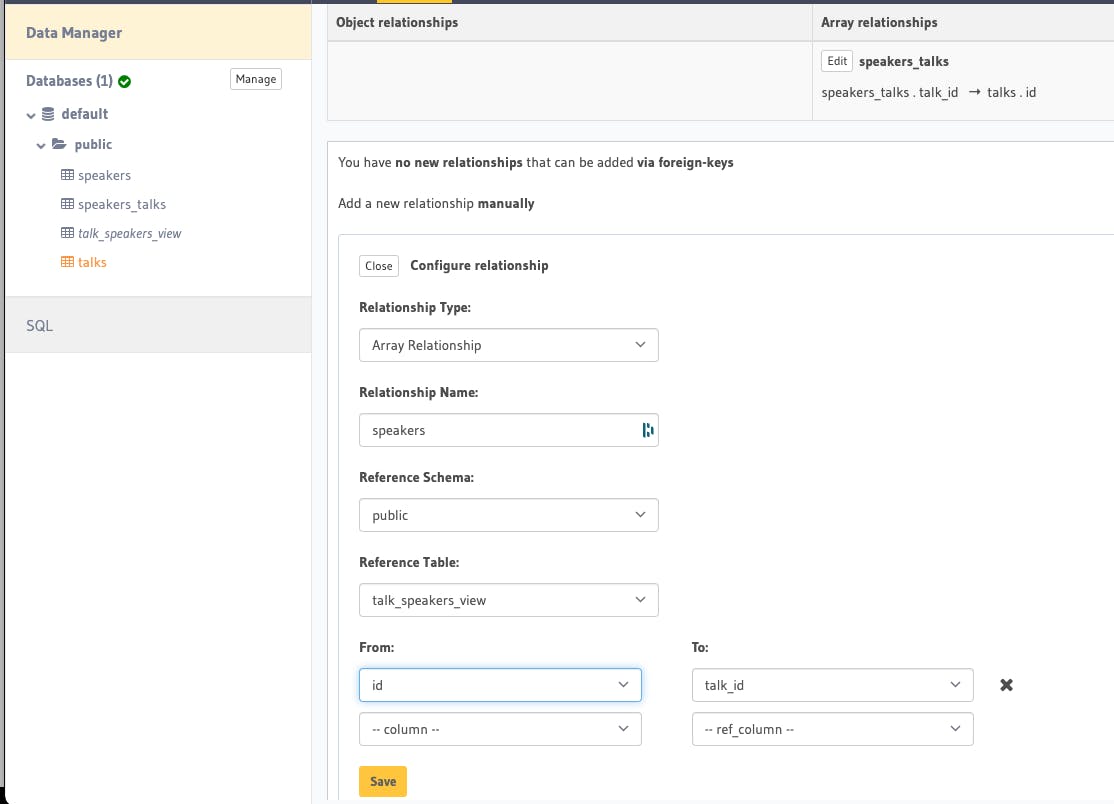
After that, your talks table should have this additional array relationship named speakers
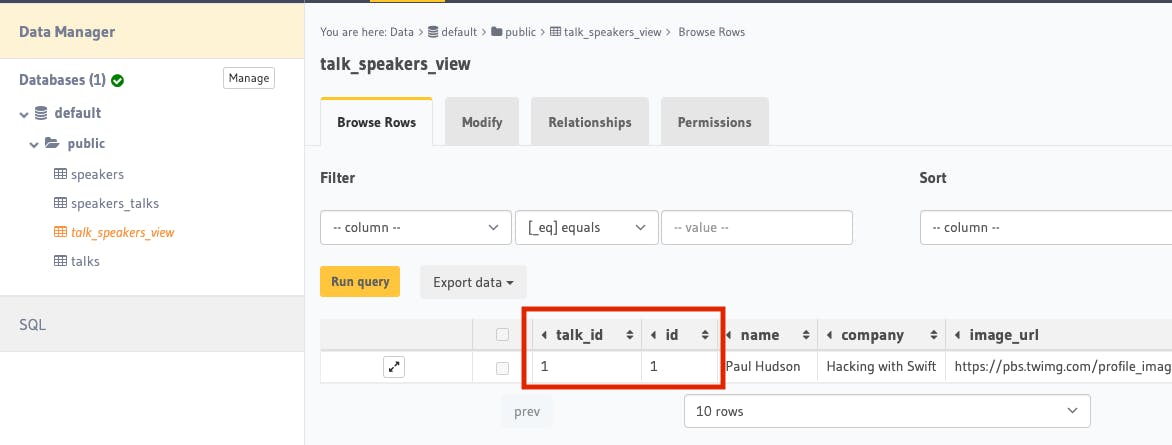
To confirm that this relationship works, you should now be able to query this from the Graphiql! Just what we wanted!
At this point, it is normal if you feel lost. I learned this flattening technique from one of Hasura doc page. Take it slow and perhaps a sip of 🥤!
Onto the next last few steps, we will improve how our talks data are queried.
Schedule View
Head over to Raw SQL and let's create a new view.
CREATE OR REPLACE VIEW "public"."schedule" AS
 SELECT talks.id,
    talks.title,
    talks.start_at,
    talks.end_at,
    talks.talk_type,
    talks.talk_description,
    talks.activity
 FROM talks
ORDER BY talks.start_at;
We also need to define a relationship with talk_speakers_view view. Go to the relationship tab of schedule and add a new relationship manually.
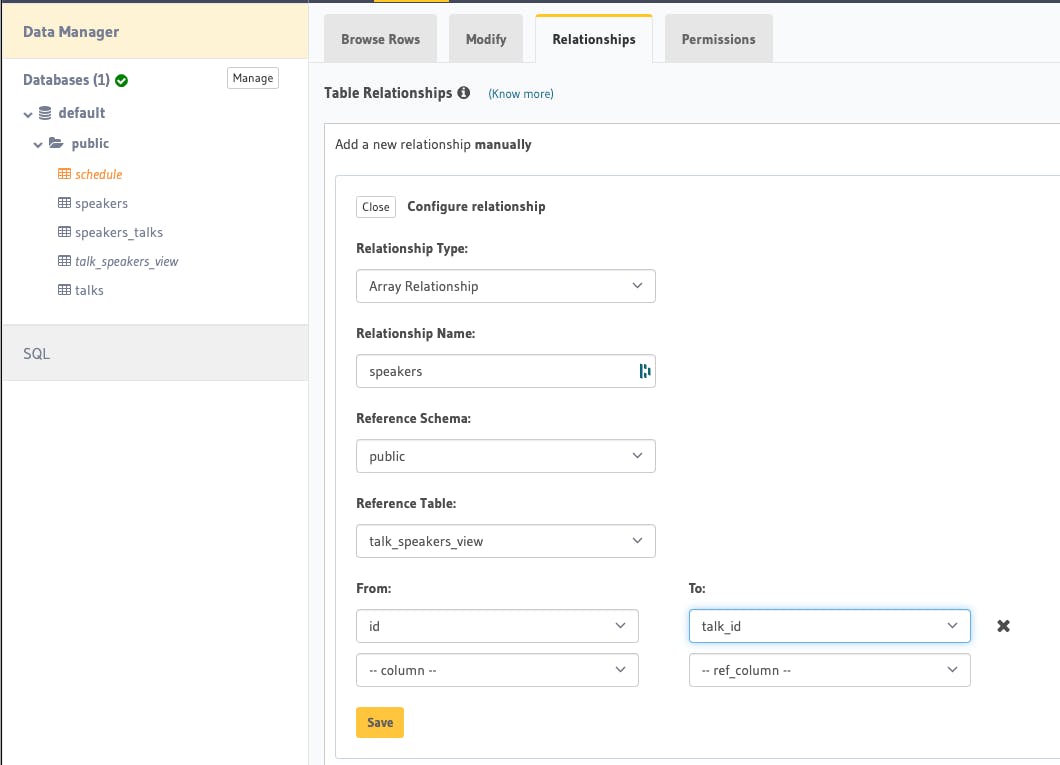
Now our query looks so much neater and readable in Graphiql, don't you think 😎?
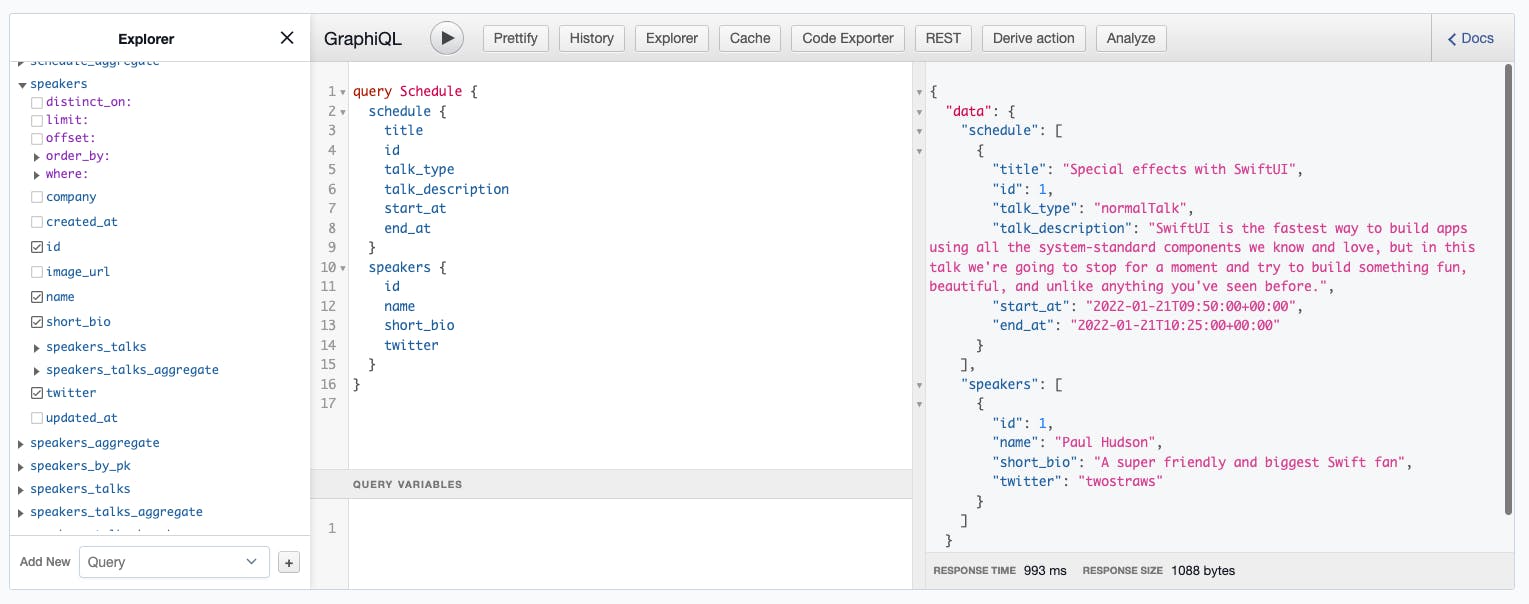
This is the query you can use.
query Schedule {
  schedule {
    title
    id
    talk_type
    talk_description
    start_at
    end_at
  }
  speakers {
    id
    name
    short_bio
    twitter
  }
}
Setup unauthorized role name
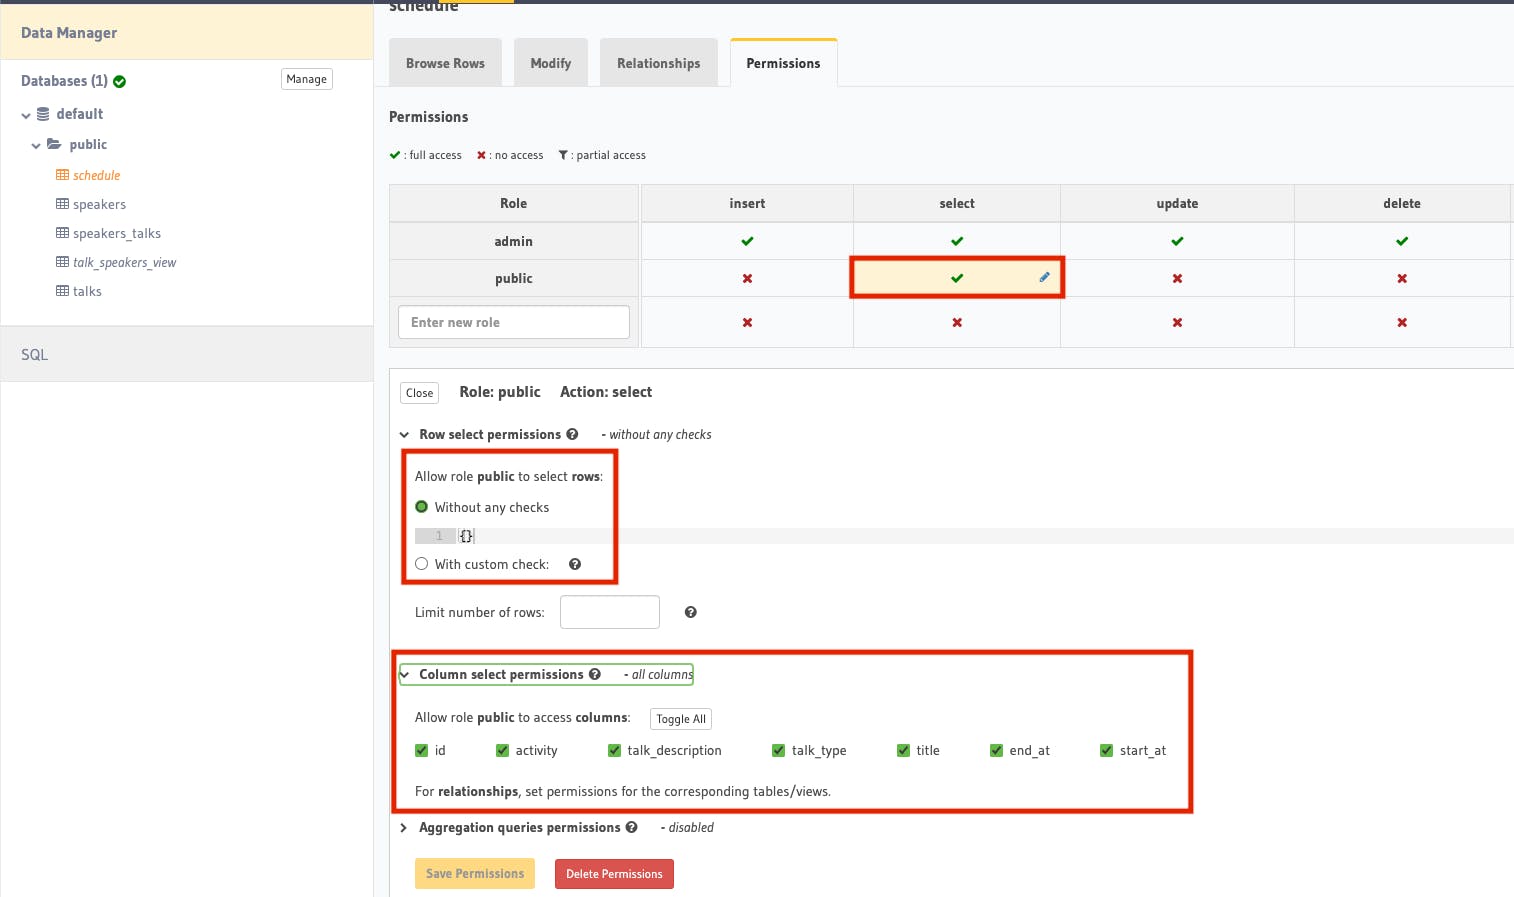
Alright we're on the last mile! What we've worked so far is accessible for us as the Hasura admin. Now we want to enable some kind of publicly allowed consumption of our schedule so that our client, web or mobile application can fetch the schedule of the conference without authorization.
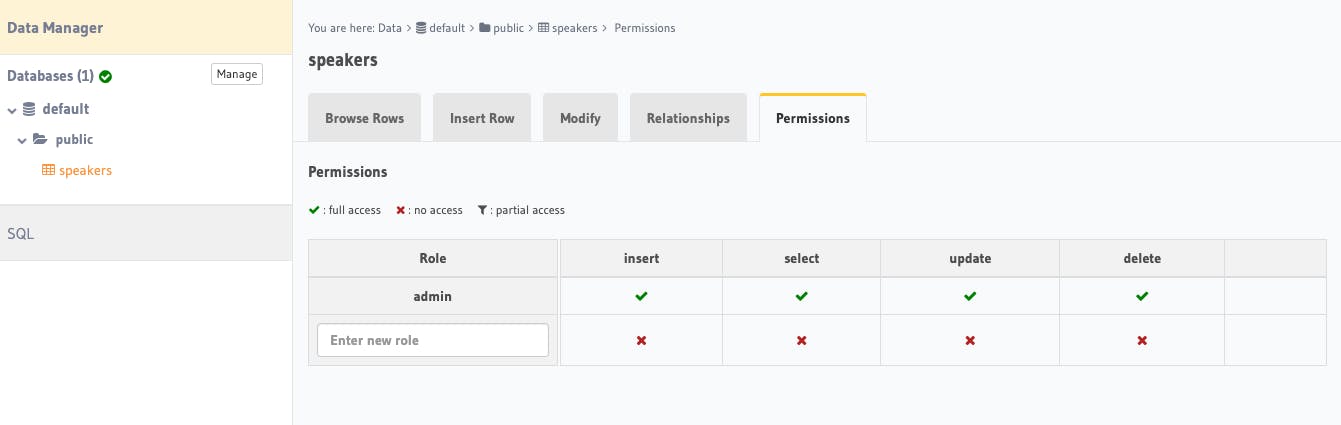
We can achieve this by adding a public read access to schedule. Go to the Permissions tab for schedule view and add a new role public with this configuration.
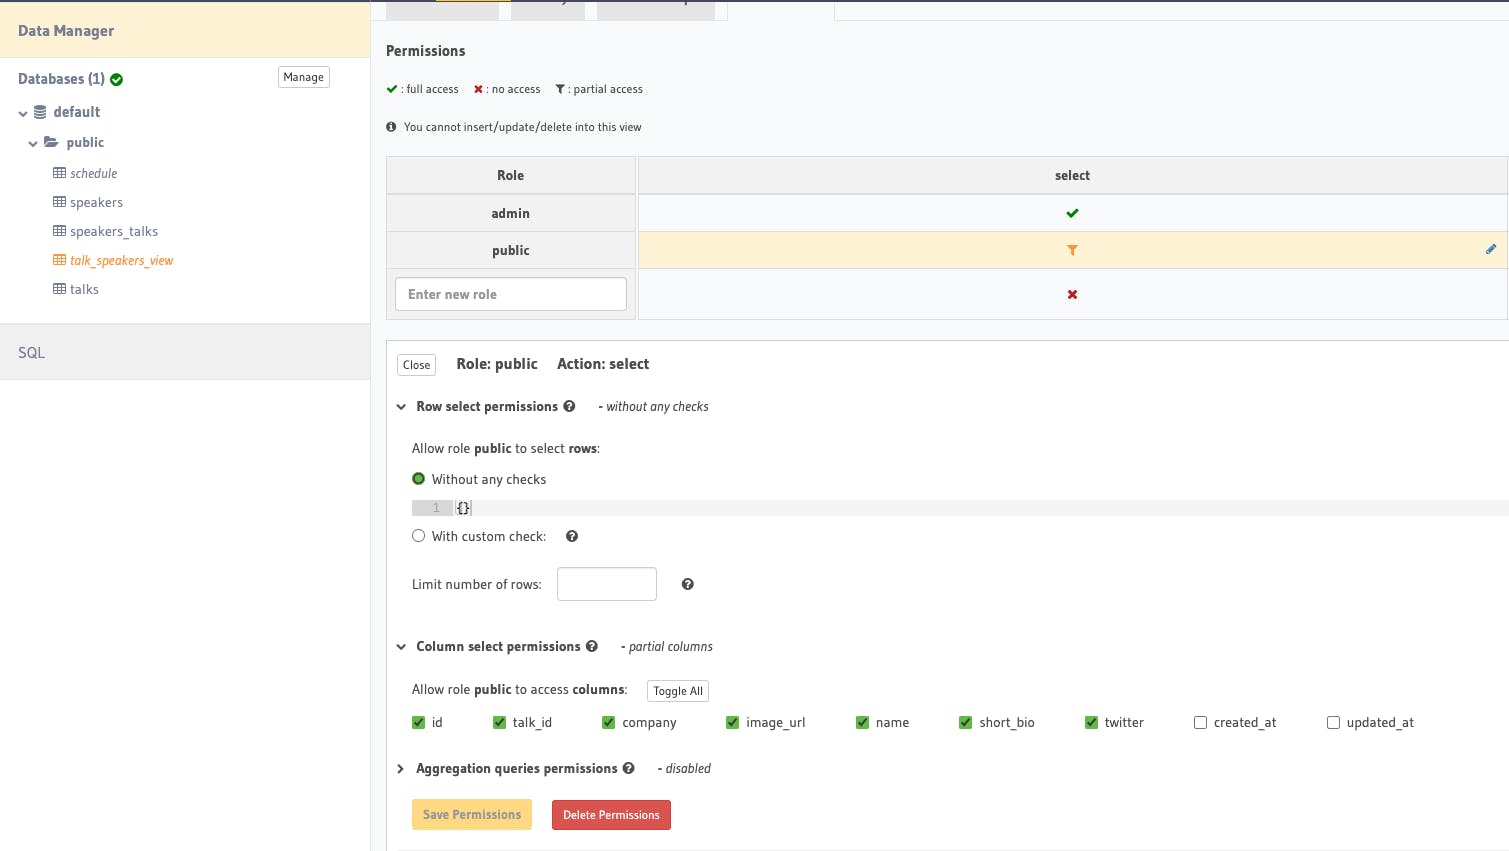
We also need to allow permission for talk_speakers_view in a slightly different setup. Anyone can read the speaker info but we don't need to expose created_at and updated_at columns.
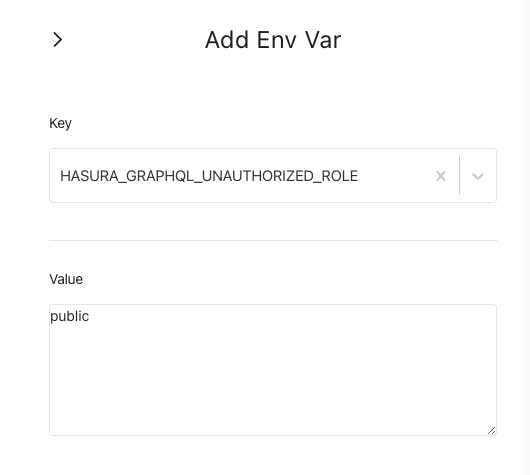
Next, head back to Hasura Cloud administration page and click New Env Var button inside Env Vars section.
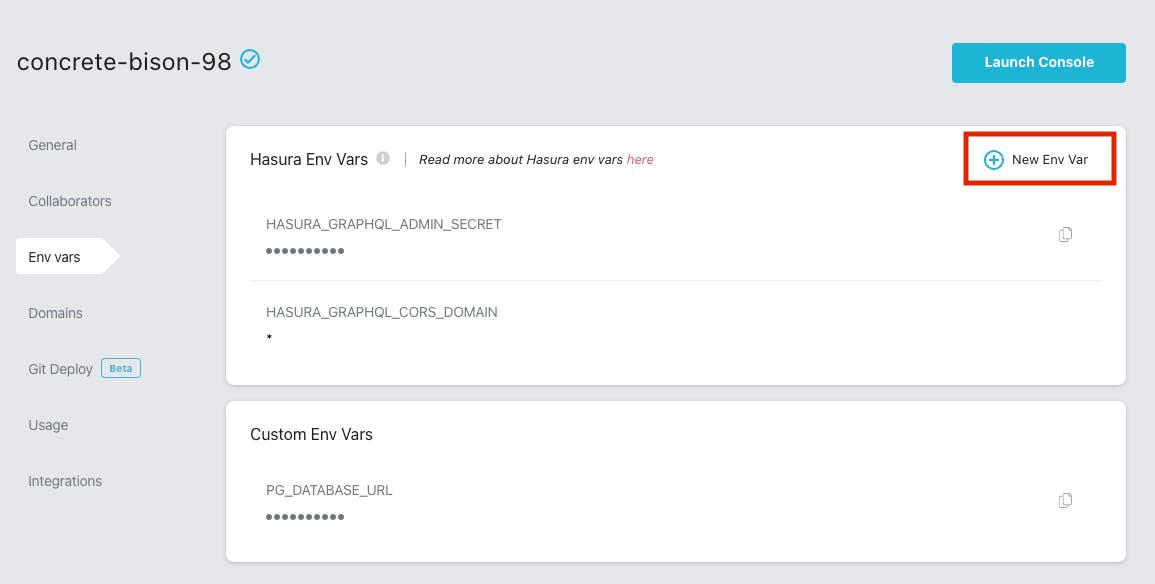
Find HASURA_GRAPHQL_UNAUTHORIZED_ROLE and enter public. This public must be the same name that you used in your view's permission.
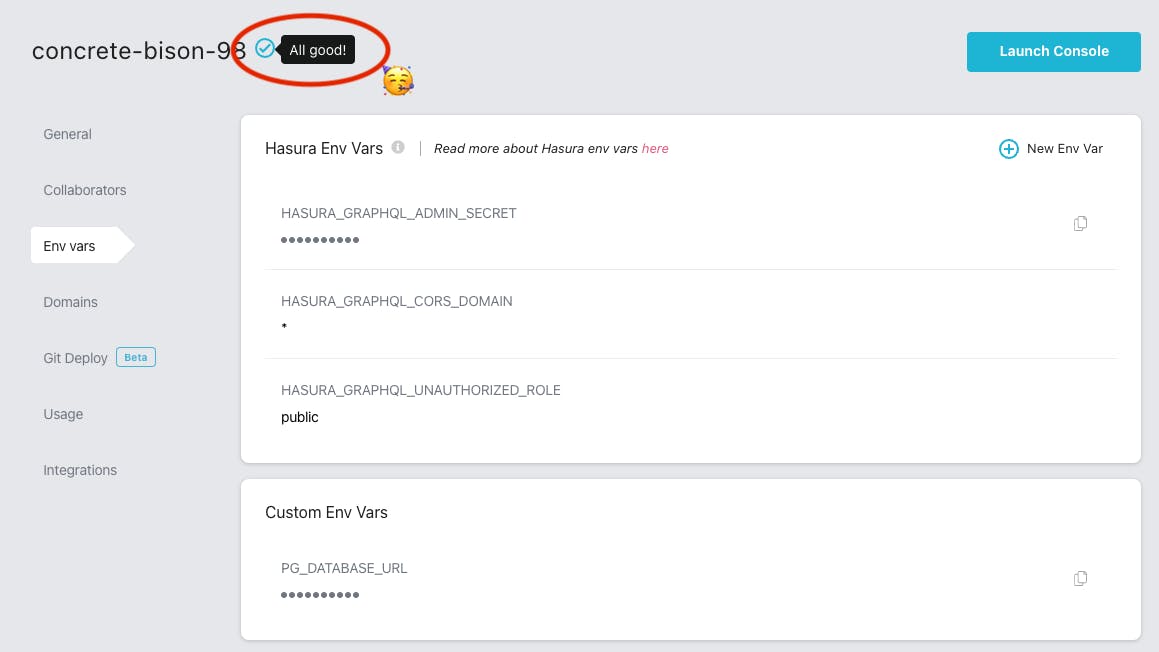
Save and wait until the refresh is done. You will know when there is a green tick next to the app name. And that means the finish line 🏁 is right in front of us!
Finally, the Subscriptions!
From Hasura Cloud admin page, click Explore GraphQL API as an unauthenticated user and you should be able to access the Public GraphQL API page.

Let's query the schedule, but replace query with subscriptions. You can paste this query.
subscription Schedule {
  schedule {
    id
    title
    talk_type
    talk_description
    start_at
    end_at
    speakers {
      id
      name
      short_bio
      twitter
    }
  }
}
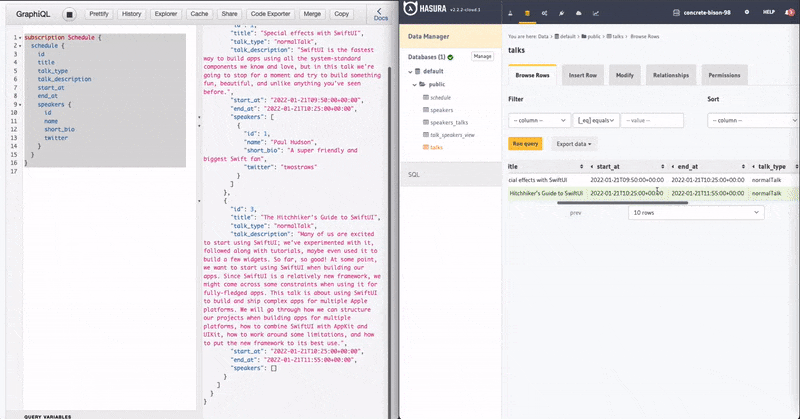
I've added 1 more speaker and a talk but haven't linked them. Now see how the GraphQL Subscription on the left instantly updated after I linked it in the normalisation table.
Closing
Congratulations 🙌🏼 you've made it here! Did you get your own API working perfectly? I hope you learn something new or even able to apply those GraphQL techniques on your own GraphQL API! I am very happy with the improvement and consistency that Hasura team has worked on until now.
If you didn't get it worked at the first try, don't give up and keep trying! Some advanced techniques I wrote didn't happen over night but discoveries since 2018 until now, I hope that this article would accelerate someone's learning :)
If you have any thoughts or questions, feel free to ask in comments or tweet me Vina Melody.
If you'd like to see the iOS app code, it's open sourced at iOS Conf SG Github.
And thank you Hashnode and Hasura for organising this hackathon and motivated me to write!